Overview
Crelate is a CRM and ATS platform designed for recruiting and staffing firms. Tenzo provides a comprehensive integration with Crelate that enables automated candidate outreach, AI-powered interviews, and seamless data synchronization.Crelate integration uses stage IDs instead of stage names for more reliable stage management. This ensures consistent behavior even if stage names change in your Crelate account.
Prerequisites
Before setting up the Crelate integration, ensure you have:- Admin access to your Tenzo account
- Admin access to your Crelate ATS with permissions to authorize third-party integrations
Tenzo connects to Crelate via Kombo, our unified API integration partner. The connection process is handled through a secure OAuth flow. Stage IDs are automatically managed by Tenzo - you’ll select stages by name in the UI.
Initial Setup
Step 1: Connect Your Crelate Account
Tenzo integrates with Crelate through Kombo, our integration partner. To connect your account:- Navigate to the Admin page in Tenzo
- Select the ATS Integrations tab
- Click Add Integration
- Select Crelate from the list of available providers
- Follow the connection wizard to authenticate with Crelate
For detailed step-by-step instructions with screenshots, see Kombo’s guide: How to link your Crelate account
Step 2: Verify Connection
Once connected, Tenzo will automatically:- Sync your jobs every 5 minutes
- Pull candidate and application data
- Verify custom field access
Configuration Settings
Crelate integrations offer the most comprehensive configuration options in Tenzo. Navigate to Admin > ATS Integrations to configure the following:Candidate Flow Stages
Configure how Tenzo manages candidates through your recruitment pipeline:Start Stages
Start Stages
Start Stages determine when Tenzo begins outreach to candidates.
- Select one or more stages where candidates should receive outreach
- Candidates moved out of these stages will stop receiving messages
- Multiple stages can be selected for flexibility
AI Interview Above / Below Threshold Stages
AI Interview Above / Below Threshold Stages
AI Interview: Above Threshold — Stage where candidates move when the interview score and completion rate meet your configured thresholdsAI Interview: Below Threshold — Stage where candidates move when the interview score or completion rate is below threshold
- Leave blank if you don’t want automatic stage movement
- Above/below threshold is determined by your configured score and completion rate thresholds
- Stage movements are logged in candidate activity
Resume Review Stages
Resume Review Stages
If resume review is enabled, configure where candidates move based on initial resume screening:Resume Review: Above Threshold — Candidates with qualifying resumes move hereResume Review: Below Threshold — Candidates with non-qualifying resumes move here
AI Opt Out Stage
AI Opt Out Stage
AI Opt Out Stage - Stage where candidates are moved when they opt out of the AI interview process and request manual reviewThis is triggered when a candidate opts out of the AI interview.
Accommodation Request Stage
Accommodation Request Stage
Accommodation Request Stage - Stage for candidates who request interview accommodationsWhen a candidate indicates they need accommodations, they are automatically moved to this stage for human follow-up.
Pending Accommodation Review Stage
Pending Accommodation Review Stage
Pending Accommodation Review Stage - Optional stage for candidates whose graded interview is held for work-accommodation reviewWhen an interview answer is flagged for Work Accommodation Review, the candidate is moved to this stage while a reviewer resolves the flag. If left blank, no stage movement occurs while the interview is under review.
Scoring & Thresholds
Above Threshold Score
AI Interview Above Threshold ScoreSet the minimum score (0-100) for a candidate to be considered above threshold for the AI interviewDefault: 60
Completion Rate
AI Interview Completion Rate ThresholdMinimum percentage of interview questions that must be completedDefault: 80%
Feedback Actions Configuration
Crelate integrations support Thumbs Up/Thumbs Down feedback actions that map to stage movements.
Automatic Stage Movement
Configure automatic stage movement for candidate scenarios:| Setting | Description |
|---|---|
| Not Interested Stage | Stage where candidates are moved when they indicate they’re not interested |
| Enable Auto-Move After Timeout | Automatically move candidates to a specific stage after inactivity |
| Timeout Days | Number of days of inactivity before automatic stage movement |
| Timeout Stage | Target stage for timed-out candidates |
Crelate Note: Crelate doesn’t support candidate rejection/disposition through the API. These settings control stage movement only. The UI may show “Auto-Reject” in the settings names, but candidates are moved to the specified stages rather than being marked as rejected.
Custom Field Mapping
Tenzo can write interview data back to custom fields in your Crelate account. You’ll need to create these fields in Crelate first, then map them in Tenzo’s settings.Navigate to Job Settings
In Crelate:
- Go to Settings (gear icon in the left sidebar)
- Under BASIC SETUP, select Jobs & Opportunities
-
Scroll down to the Custom Fields section

Create Job-Level Custom Fields
Click Add new Custom Field (green plus button) and create the following field:Display Name: “Tenzo Job Link”Logical Name: “tenzo_job_link” (or your preferred name)
- Must be unique
- This exact name will be used in Tenzo’s ATS Settings
Navigate to Candidate Settings
Now set up custom fields for candidates:
- Go to Settings (gear icon in the left sidebar)
- Under BASIC SETUP, select Contacts
-
Scroll down to the Custom Fields section
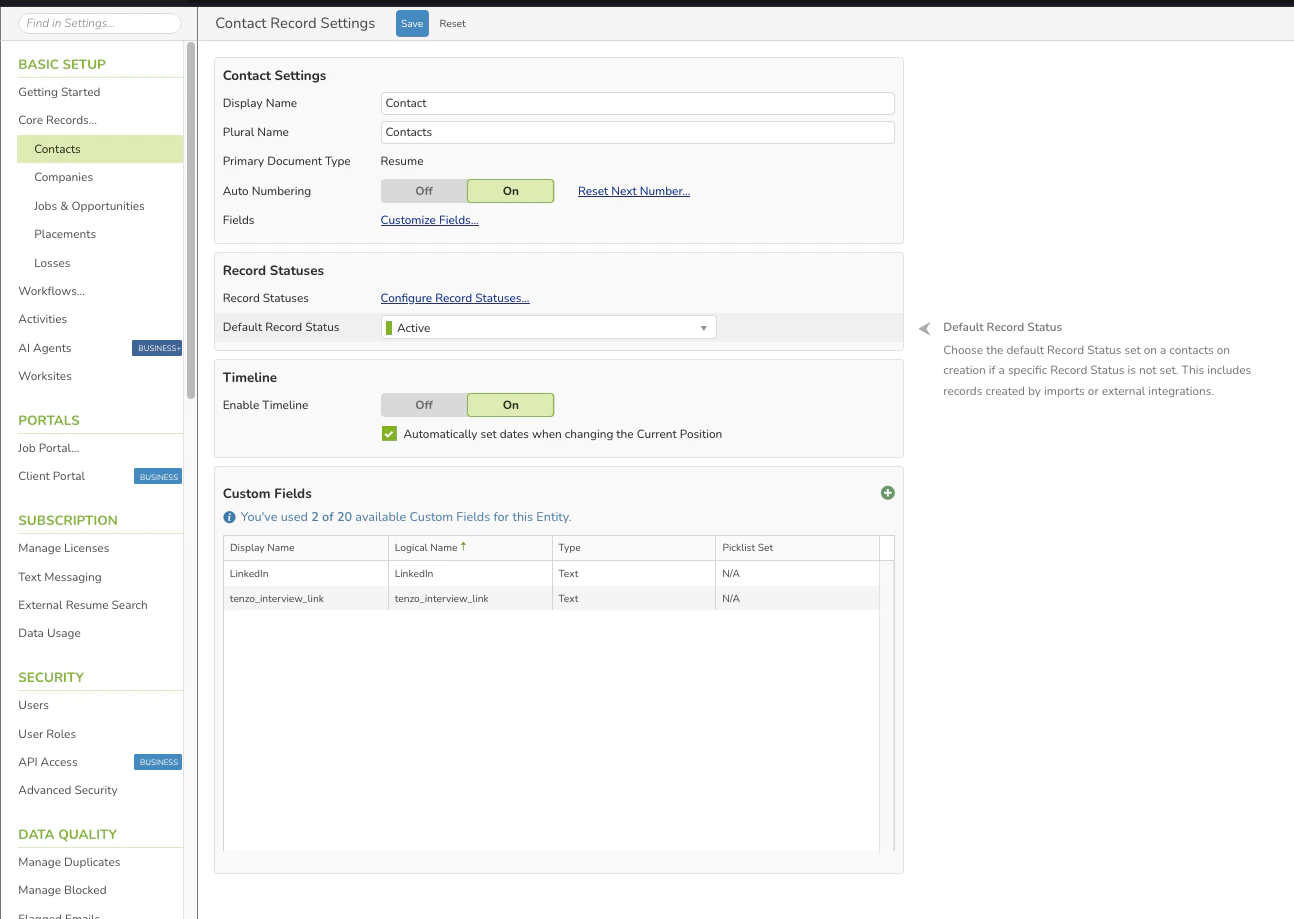
Create Candidate-Level Custom Fields
Click Add new Custom Field (green plus button) and create the following fields:Field 1: Interview Link
- Display Name: “Tenzo Interview Link”
- Logical Name: “tenzo_interview_link” (or your preferred name)
- Type: Text
- Picklist Set: N/A
- Display Name: “Tenzo Interview Score”
- Logical Name: “tenzo_interview_score” (or your preferred name)
- Type: Numbers (Decimal)
- Picklist Set: N/A
Map Fields in Tenzo Settings
After creating and saving the custom fields in Crelate:
- Navigate to Tenzo’s Admin > ATS Integrations page
- The custom fields should now appear in the dropdown selectors
- Map your Crelate fields to the appropriate Tenzo settings:
- Tenzo Job Link Custom Field → Select your “tenzo_job_link” field
- Interview Link Custom Field → Select your “tenzo_interview_link” field
- Candidate Score Custom Field → Select your “tenzo_interview_score” field
Application Score Custom Field- Not available in Crelate (skip this field)
- Click Save to apply your configuration
Fields must be saved and active in Crelate before they’ll appear in Tenzo’s settings dropdowns.
Test the Integration
Verify the custom field mapping is working:
- Run a test interview with a candidate
- After the interview completes, check the candidate record in Crelate
- Verify that the interview link and score appear in your custom fields
- Check the job record to confirm the Tenzo job link was written
Pro Tip: Crelate shows you how many custom fields you’ve used (e.g., “You’ve used 1 of 20 available Custom Fields”). Make sure you have available slots before creating new fields.
Auto-Activation Settings
Control how automatically generated jobs are activated: Enable Auto-Activation - Toggle automatic activation of jobs created with auto generated scripts Delay Activate Generated Job (Hours) - Hours to wait before auto-activationActivity Feeds
Configure whether communication activity is synced to Crelate:- Text Activity Feed Enabled - Post SMS messages as notes in Crelate
- Email Activity Feed Enabled - Post email messages as notes in Crelate
Sync Settings
Sync Applicants for Paused Jobs - Whether to continue syncing candidates for paused/inactive jobs Disable this to reduce sync volume for jobs you’re no longer actively recruiting for.Common Workflows
Workflow 1: Basic Interview Automation
Workflow 2: Resume Review + Interview
Best Practices
Stage Management
- Use clear, descriptive stage names in Crelate
- Test stage movements with a test candidate
- Keep your stage structure simple initially
- Review stage configuration after first few interviews
Custom Fields
- Create custom fields before configuring mapping
- Use consistent naming conventions
- Test field updates with sample candidates
- Document field purposes for your team
Thresholds
- Start with default thresholds (60 score, 80% completion)
- Review first 20-30 interviews before adjusting
- Adjust based on your specific role requirements
- Document threshold rationale for your team
Communication
- Enable activity feeds for complete audit trails
- Review synced notes to ensure quality
- Train team on how Tenzo messages appear in Crelate
Troubleshooting
Connection Issues
Connection Issues
Possible Causes:
- Incorrect Crelate credentials
- Insufficient permissions in Crelate
- Third-party integrations blocked
- API connection timeout
- Verify you have admin access to Crelate
- Check that third-party integrations are enabled in Crelate settings
- Try disconnecting and reconnecting the integration
- Consult Kombo’s connection guide
- Contact Tenzo support if issues persist
Candidates Not Moving Stages
Candidates Not Moving Stages
Possible Causes:
- Incorrect stage selected in configuration
- Candidate not in start stage
- Interview not completed or scored
- API connection issues
- Verify stage selections in Tenzo ATS Settings
- Check candidate’s current stage in Crelate
- Review interview completion status
- Test API connection in Admin > Integrations
Jobs Not Syncing
Jobs Not Syncing
Possible Causes:
- Jobs are archived or closed in Crelate
- API rate limiting
- Job sync filters active
- Ensure jobs are active in Crelate
- Wait for next sync cycle (5 minutes)
- Check sync settings for filters
- Review API rate limit status
Activity Feed Notes Not Appearing
Activity Feed Notes Not Appearing
Possible Causes:
- Activity feed disabled in settings
- API permissions don’t include note creation
- Notes added to wrong entity type
- Enable activity feeds in ATS Settings
- Verify API credentials have note permissions
- Check candidate record vs application record
API Limitations
Application Custom Fields - Not Supported
Application-level custom fields are not available in Crelate. This is a Crelate platform limitation, not a Tenzo limitation. Workaround: Use candidate-level custom fields instead. Be aware that:- Candidate fields will be overwritten if a candidate applies to multiple jobs
- Each new interview will update the candidate’s score field
- For job-specific data, consider using job-level fields or notes
Getting Help
Tenzo Support
For Tenzo-specific questions:Contact Support
Kombo Integration Help
For connection and sync issues:Kombo Help Center
Crelate Documentation
For Crelate platform questions:Consult your Crelate API documentation
Next Steps
After setting up your Crelate integration:- Job-Specific Settings - Customize interview settings for individual jobs
- Rules Engine - Automate ATS workflows with conditional rules
- Create Your First Interview - Learn how to set up and configure interviews