

Post-Meeting: Summaries & ATS Sync
Summary Generation (Interview)
Once the meeting bot or a live recording session finishes recording an interview (either when the meeting ends, the bot is manually removed, or recording is stopped), a summary is automatically generated. The summary:- Is formatted in markdown.
- Incorporates the template’s summary format configuration (note sections + custom sections).
- Appears in the Summary tab of the note view.
- Can be copied to clipboard using the copy button.
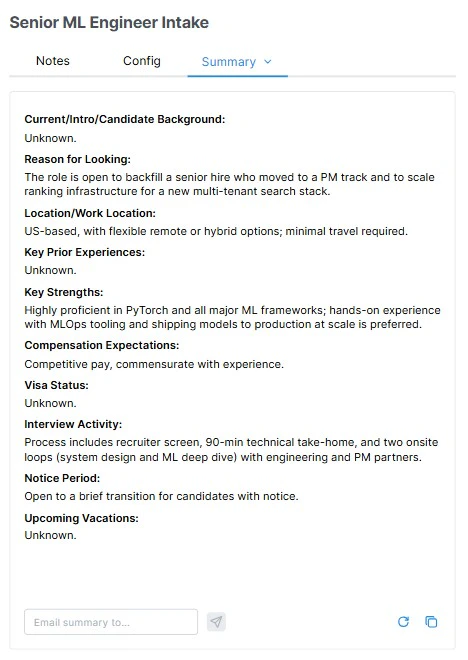
Summary tab — the generated meeting summary rendered from the template against the interview conversation
Job Description Generation (Intake)
For intake meetings, Tenzo generates job descriptions after the bot or live recording session finishes:- Each job description template on the preset is rendered with details extracted from the conversation (title, requirements, responsibilities, etc.). When your ATS exposes multiple description fields, every field’s template is rendered into its own job description; otherwise the single generic template produces one job description.
- Tenzo extracts job-field values from the transcript. With an ATS, that uses the fields selected in the template’s ATS Job Sync list (e.g. salary, start date, employment type, location). Without an ATS, Tenzo extracts against its built-in Job Sync fields (title, description, location, and related job details).
- The generated job descriptions appear in the Job Description tab of the note view. The tab shows every generated description — one per ATS description field, each labeled by its field name (or a single description when there are no ATS fields). Each one can be regenerated individually, so you can re-run just the internal or just the public version without touching the others, and copied to clipboard with its copy button — the copy keeps the description’s formatting, so pasting into a rich-text editor (or your ATS) preserves it.
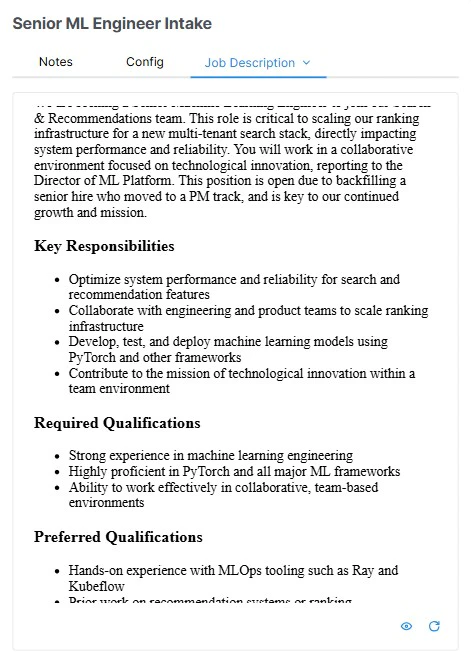
Job Description tab — generated job descriptions (one per ATS description field) rendered from the preset's templates against the intake conversation
Summary / JD Email
After generation, an email is sent to the configured recipient (or meeting organizer) containing the output.- Interview notes receive the HTML meeting summary plus a link back to the full note in Tenzo.
- Intake notes receive the rendered HTML job description plus a field-by-field preview of the ATS writes that will (or did) happen — each row shows the field name, the current ATS value, and the newly extracted value, so you can eyeball the diff before the write lands.
Intake Context for AI Interview Scripts
When Tenzo generates or regenerates an AI interview script for a Job, it looks up Meeting Copilot or Autopilot intake notes linked to that Job — either by the Tenzo Job itself or by the linked ATS job id — and uses the AI Interview Script Context from those notes, or their meeting summary when that context is unavailable, alongside the job description. That lets screening questions, intros, and outreach copy reflect what was discussed in the Meeting Copilot / Autopilot intake (must-haves, compensation, nuances) instead of relying on the JD alone. If no linked intake note exists, generation falls back to the job description.ATS Sync / Job Sync
Interview notes — If configured in the template’s summary format, the summary is automatically posted to your ATS:- Candidate record — The summary appears as a note on the candidate’s profile.
- Application record — The summary appears as a note on the specific application.
- Both — Posted to both locations.
- Description fields are populated with their rendered HTML job description — each description field gets the body generated from its own template.
- Non-description fields are populated with the values extracted from the transcript.
- Per-note overrides on the Config tab narrow what’s written for that specific note.
- After the meeting, Tenzo extracts job title, description, and related fields from the transcript (plus the generated job description).
- Create is available once create-required fields are filled — currently Job Title and Job Description. You can finish any gaps in the Job Sync table, then click create. If Create Tenzo screen is on and extraction already filled those fields, Tenzo creates the Job automatically after the meeting. With the setting off, or with either field still missing, you finish the create manually from Job Sync. The Job remains paused for review.
- Creating the Job also starts AI interview script generation and links the note to the Job, so the Sourcing tab appears (see Source Candidates).
- Later updates from Job Sync write into the Tenzo Job and re-run script generation so the interview script stays aligned with the latest job details. The panel explains this before you sync.
- If you unlink the Job in Config, Job Sync returns to creation mode.
Note action by meeting type
When a summary is posted as a note, the note’s action reflects the meeting type, so each meeting type is easy to distinguish (and filter) in your ATS. For Bullhorn, the default action labels are:
These defaults can be customized per organization. Reach out to Tenzo if you’d like different note-action labels for your Bullhorn instance. Bullhorn instances that validate
Note.action values must have all five labels above configured as valid actions before summaries will post under the intended categories.
Creating a company or contact from the picker
When you create a new job from a note, the ATS Sync tab (reading Creating a new ATS job) asks you to pick the client company and hiring contact from your ATS. Tenzo searches your ATS by name as you type. If the record doesn’t exist yet — for example a brand-new client discussed in the intake — the picker offers a Create new company / Create new contact option for the name currently in the search box after its search finishes with no matches.- Selecting it shows a short confirmation (the entity type, the name, and — for a contact — the parent company) before anything is written.
- On confirmation, Tenzo creates the record directly in your ATS and selects it, so you can finish creating the job without leaving Tenzo.
- A contact is always created under the company you’ve already picked, so choose the company first. Tenzo splits the typed name into a first and last name on the final space.
Job Owner
The ATS Sync panel includes an optional Job Owner picker alongside the company and contact fields. Search your ATS users by name and select who should own the job. Unlike company and contact, leaving it blank never blocks the create — Tenzo falls back automatically. When the job is created, the owner is resolved in this order, stopping at the first that applies:- The owner you picked in the ATS Sync panel for this note.
- The note creator, matched to an ATS user by email.
- The template’s default owner (set in the preset’s ATS Job Sync sub-section), used when the creator can’t be matched.
- Your ATS’s own default owner logic, when none of the above resolve.