Beta Feature — Meeting Copilot is currently in beta. To request access, please reach out to the Tenzo team directly.
Requesting Access
Meeting Copilot is currently in beta. To enable the feature for your organization:- Contact the Tenzo team directly to request beta access.
- Once enabled, the Meeting Copilot tab will appear in your sidebar navigation.
- No additional per-user setup is required — all members of your organization will have access once the feature is turned on.
Microsoft Teams App Installation & Setup
Meeting Copilot integrates with Microsoft Teams so you can launch the note-taking experience directly from within a meeting’s side panel.Prerequisites
Your organization must have a Microsoft Calendar integration connected in Tenzo. The Teams app uses your existing Microsoft tenant link to authenticate — no separate login is required.Installing the App
- Have your Teams admin navigate to the Teams admin center.
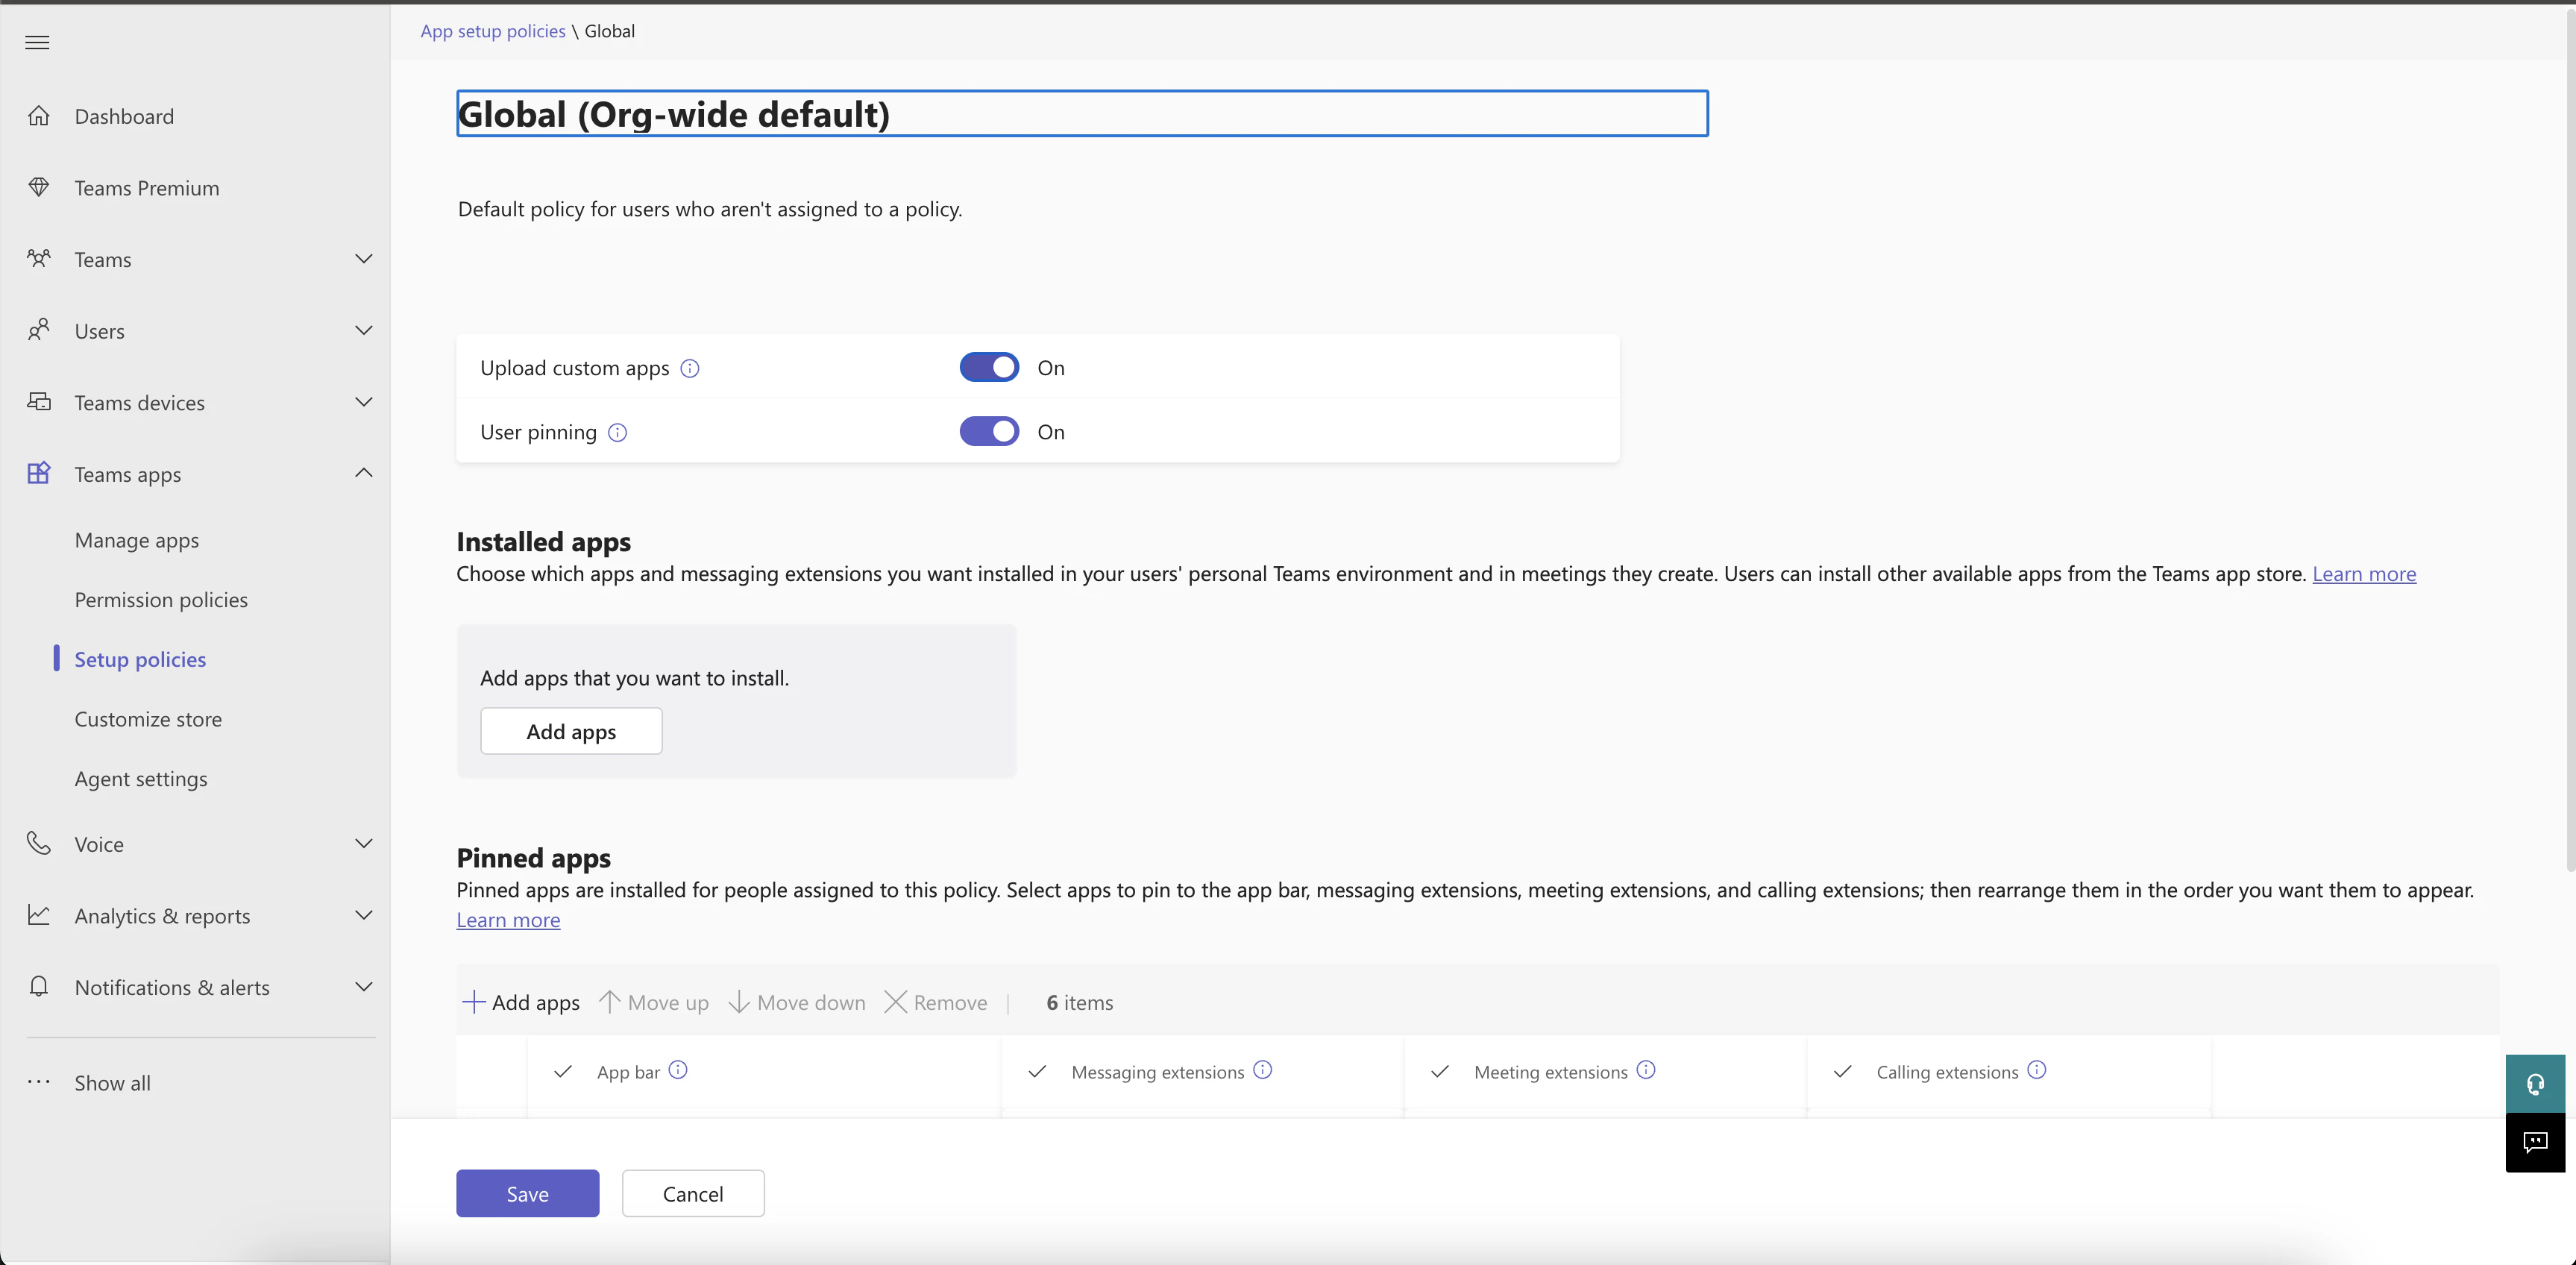
- Go to Teams apps > Setup policies.
- Click on the Global (Org-wide default) policy and enable the Upload custom apps permission, then save.
- Download the Tenzo Meeting Copilot app package from here.
- Navigate to Teams apps > Manage apps, click Actions in the top right of the page, then select Upload new app and upload the downloaded Tenzo app package.
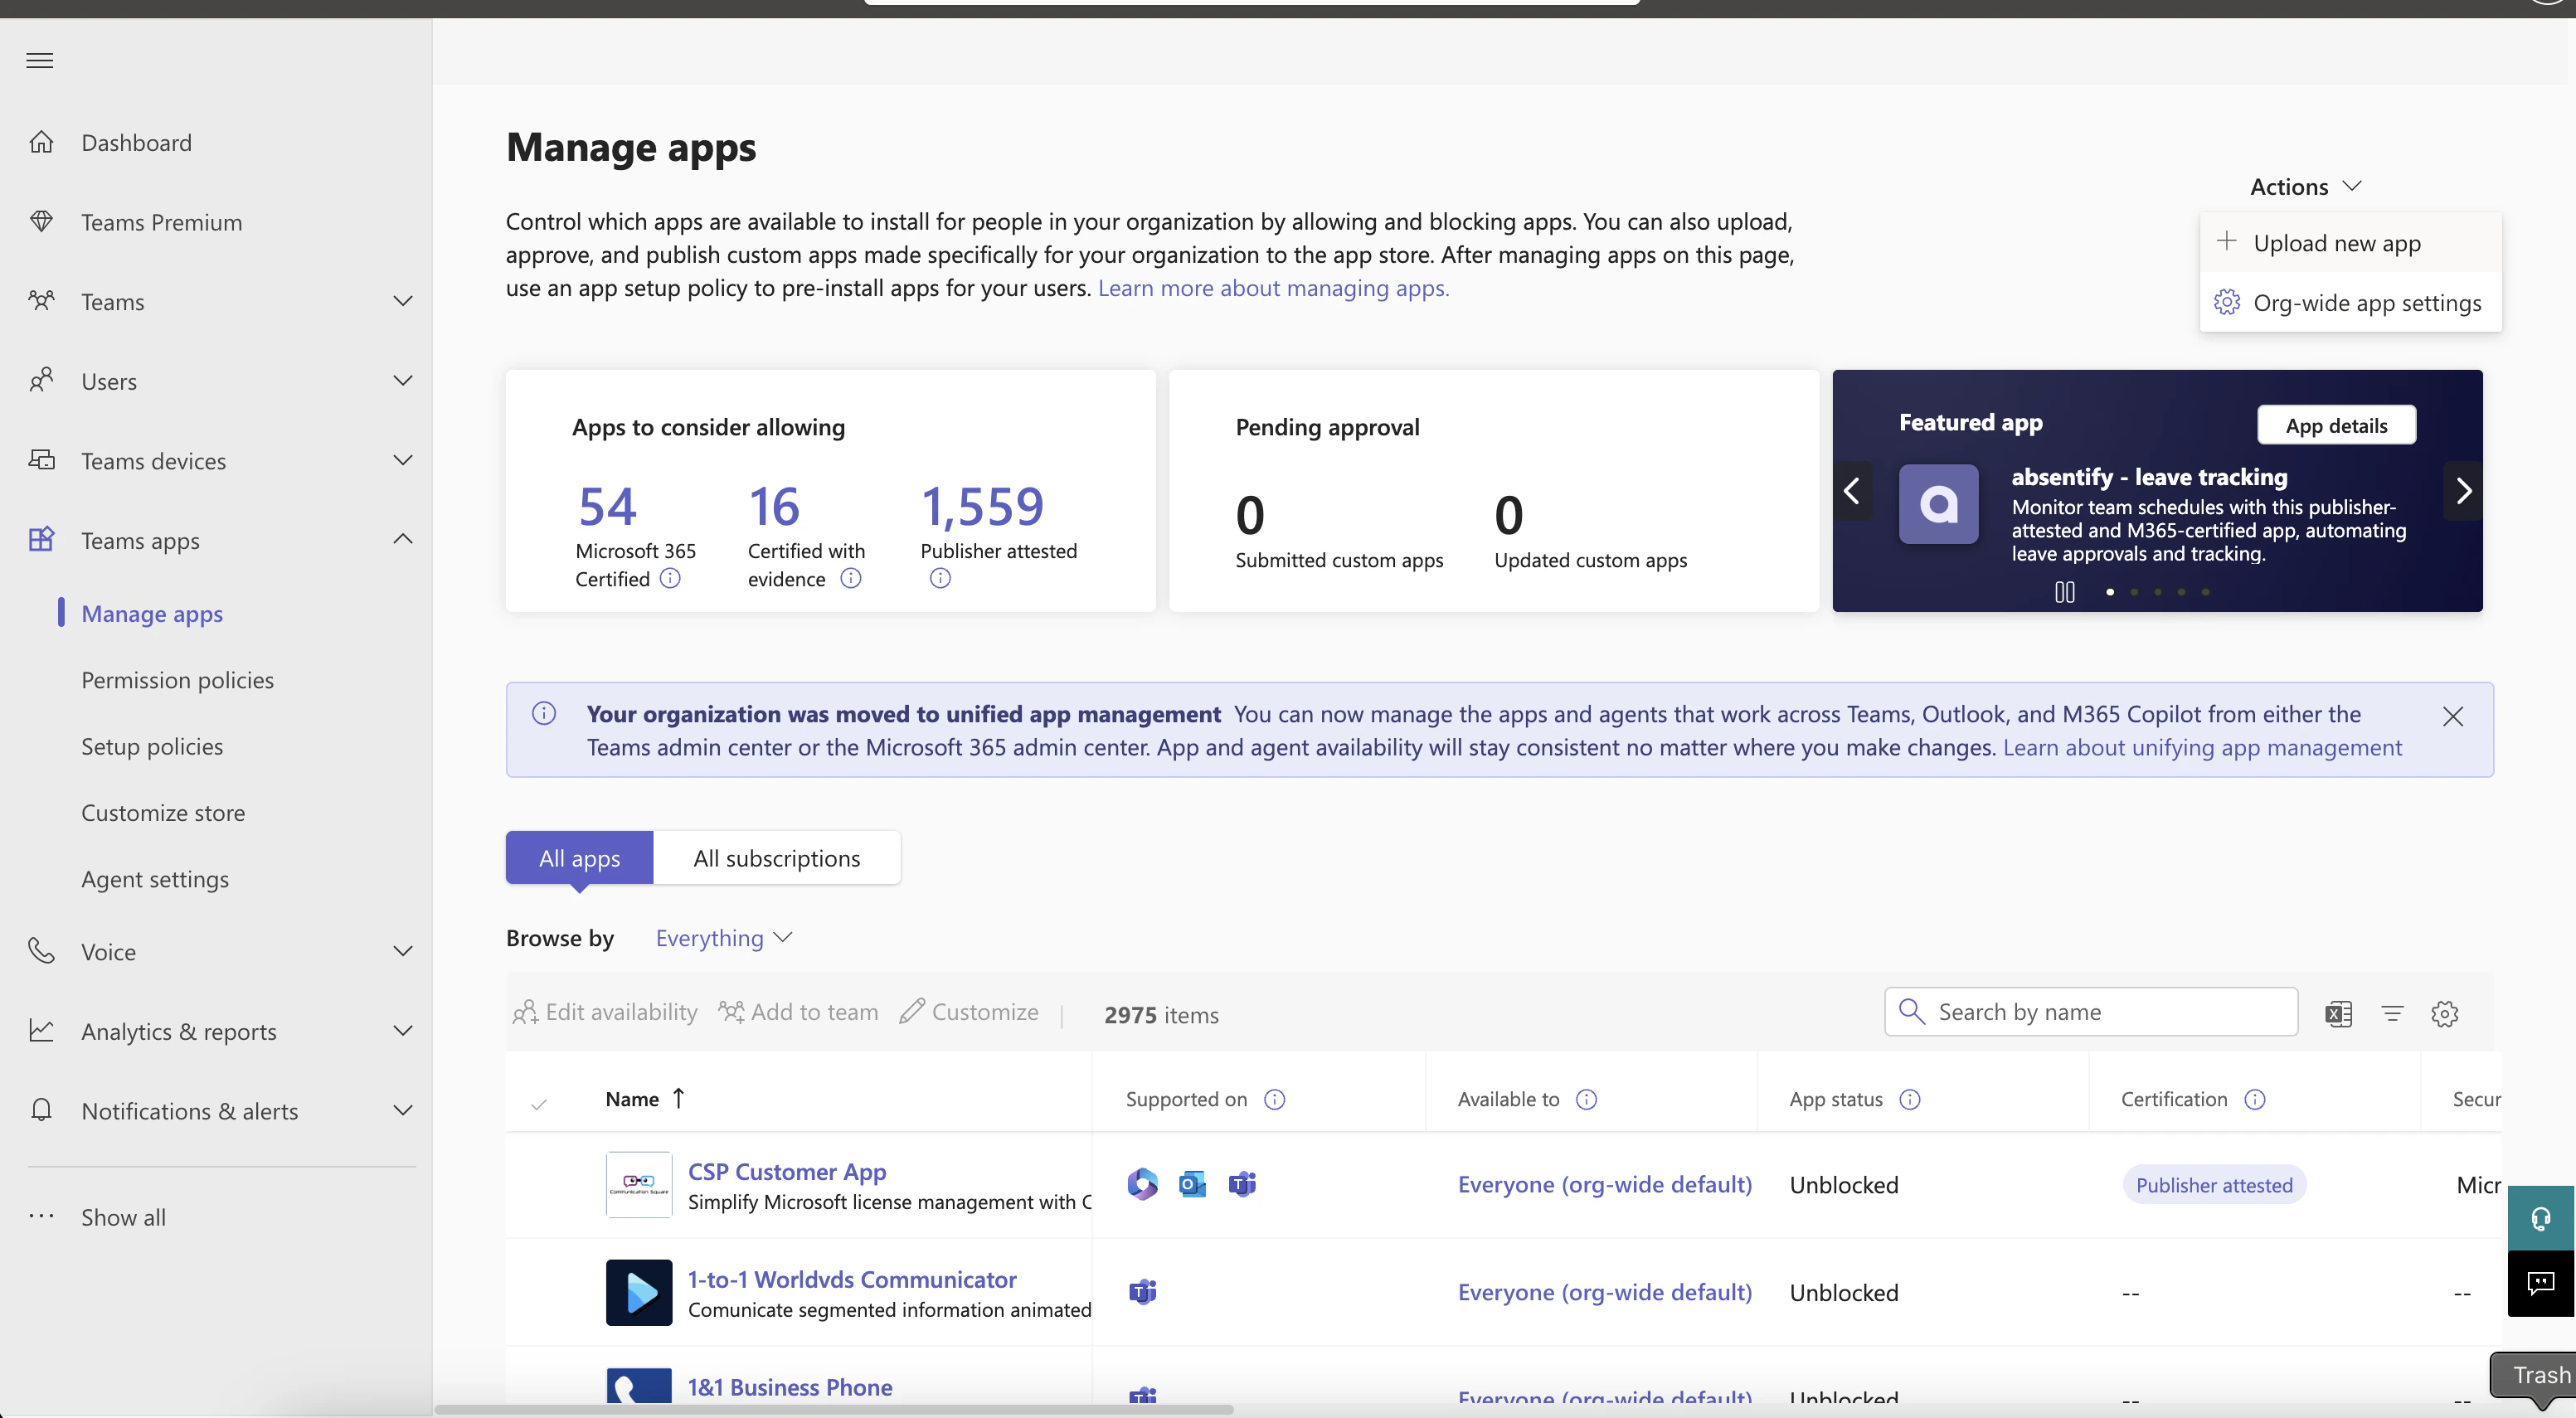
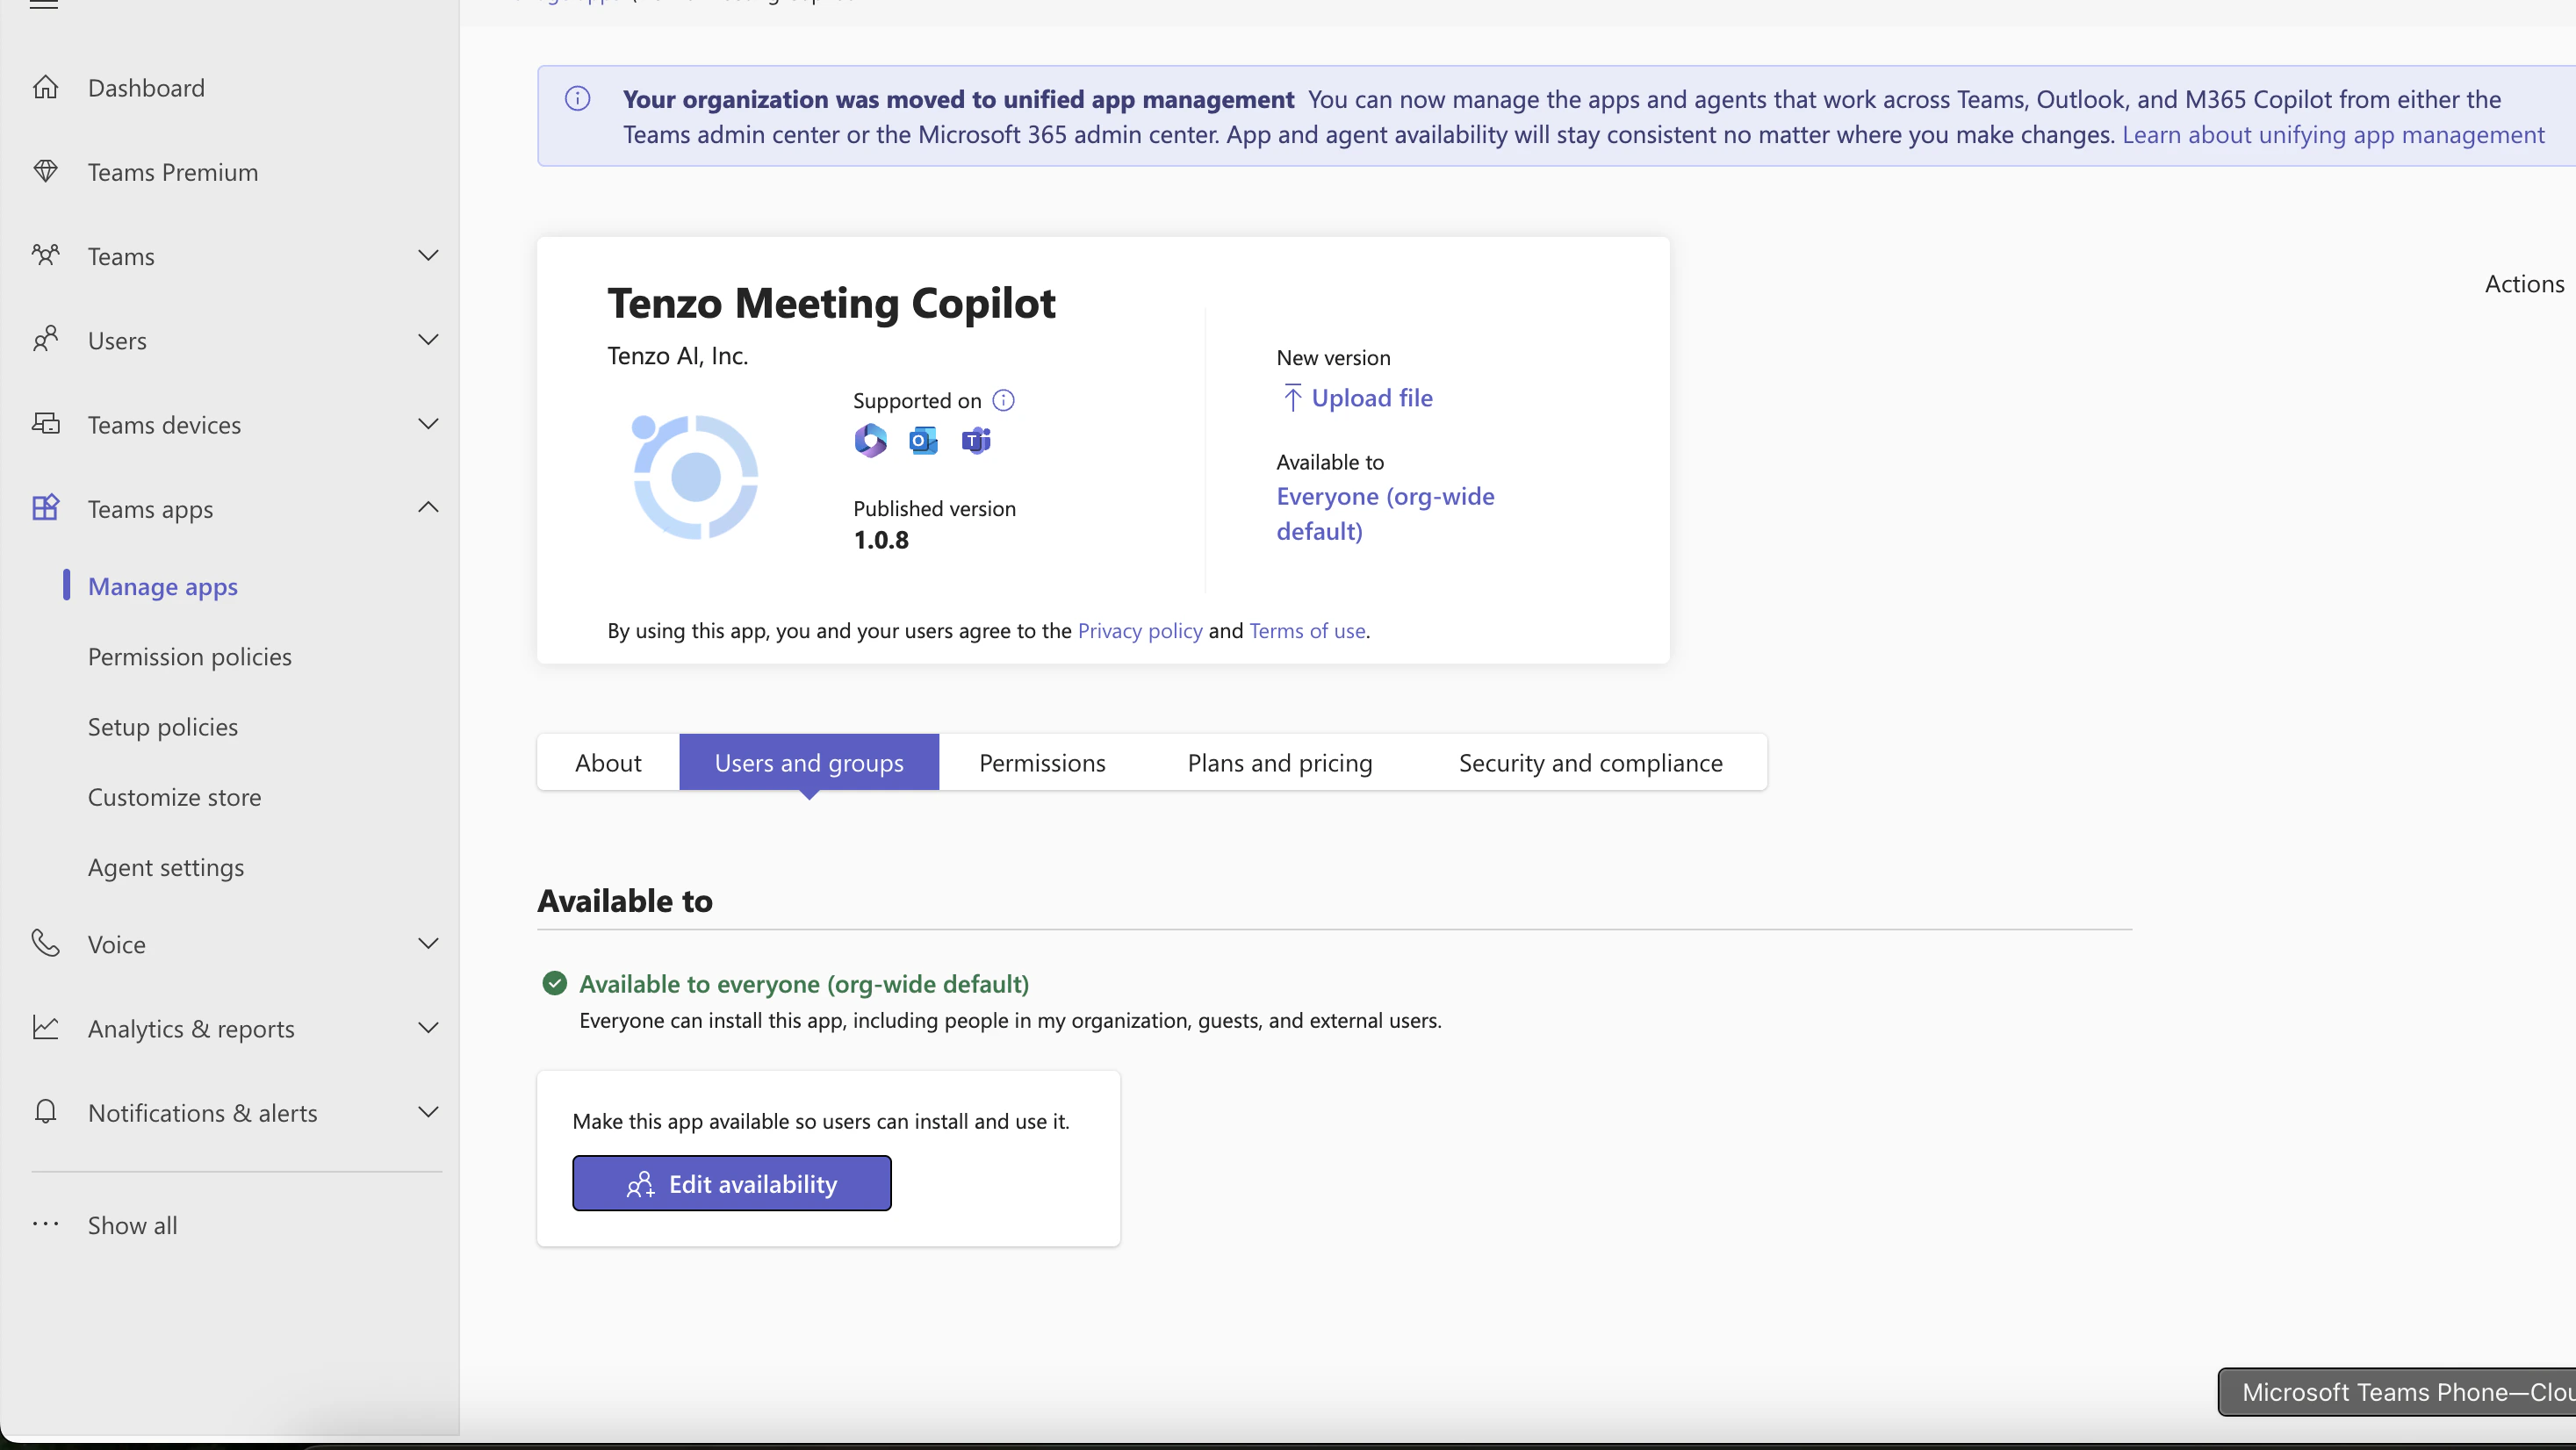
- Once uploaded, search for Tenzo Meeting Copilot in the All apps table and click on the app title.
- Under Users and groups, configure who this app should be available to.
- The app will request the following permissions:
- Read basic meeting info
- Read meeting participant info
- Write to meeting stage (for notifications)
- Once installed, the app is available to all users in your Teams tenant.
Pinning the App to Meetings
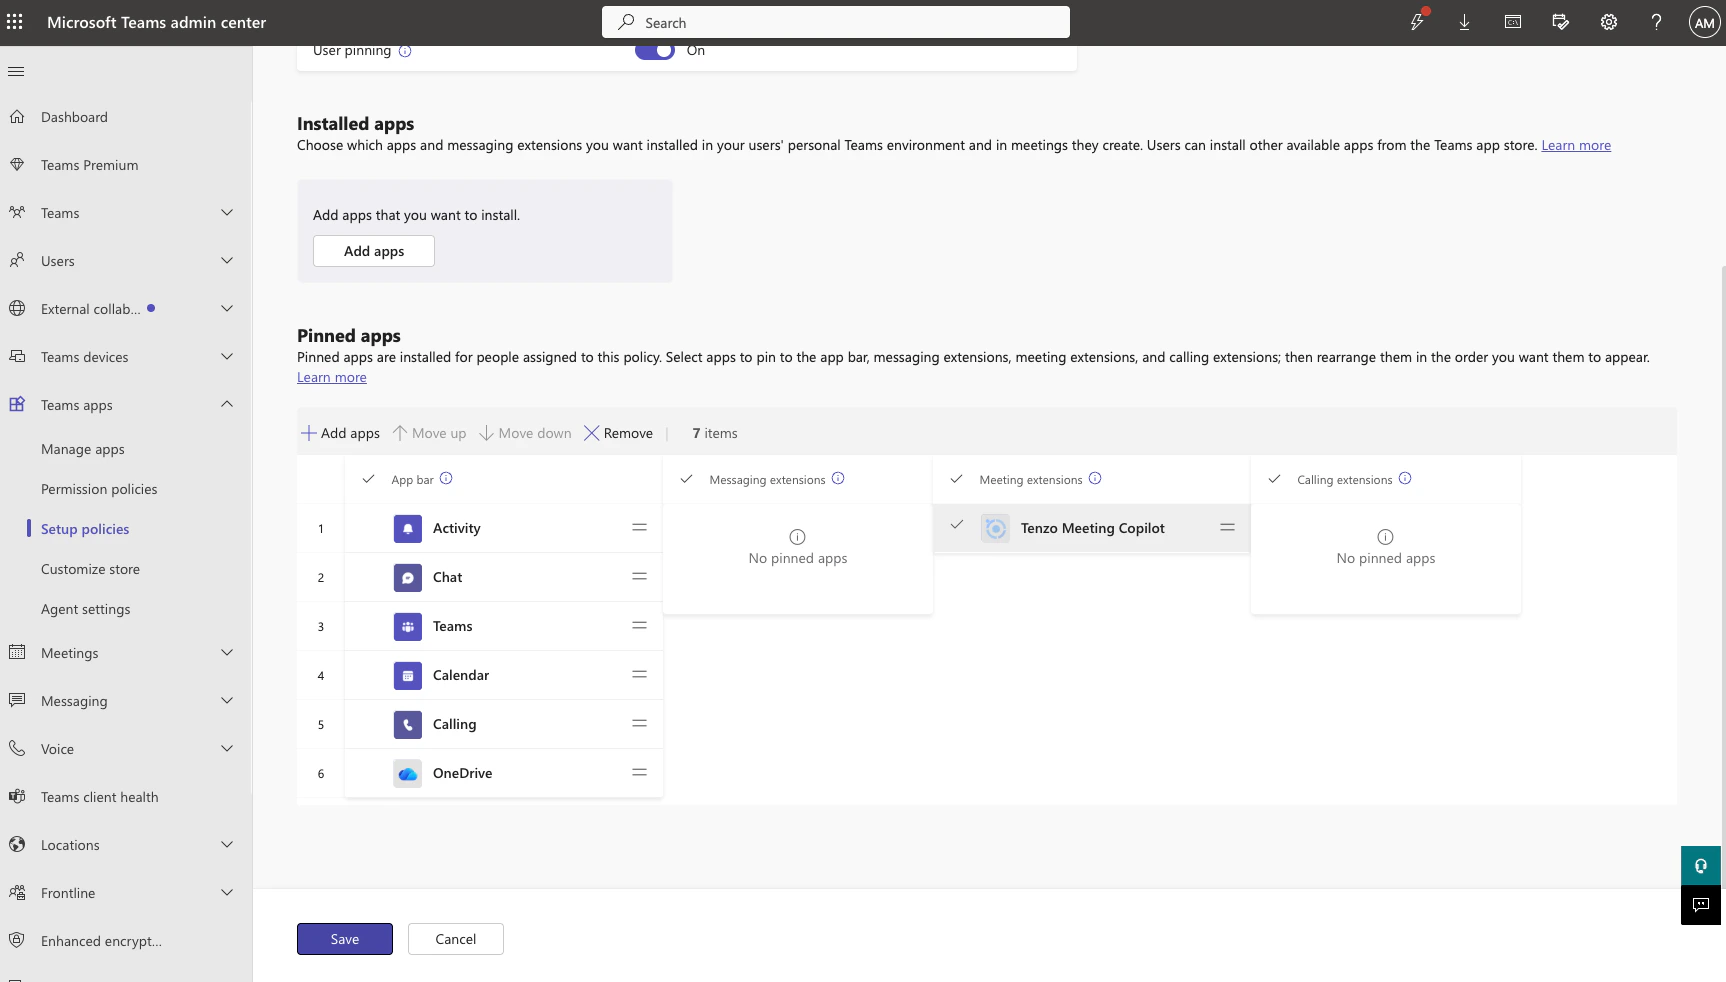
To make the Tenzo Meeting Copilot easily accessible during meetings, pin it in your organization’s app setup policy:- Navigate back to Teams apps > Setup policies and click on the Global (Org-wide default) policy.
- Scroll down to Pinned apps and click + Add apps.
- Search for Tenzo Meeting Copilot and add it.
- Once added, Tenzo Meeting Copilot should appear in the Pinned Apps table under the Meeting extensions column.
- Click Save.
Adding the Tab to a Meeting
Once the app is pinned org-wide (previous section), it will appear directly in the meeting toolbar — no manual tab add is required.
- Open a Teams meeting and click the + icon to add a tab.
- Search for Tenzo Meeting Copilot and select it.
- Links to an existing note if one was already created for this meeting, and resumes editing it.
- Reuses a scheduled interview when one is detected (via the calendar integration), creating a note linked to the candidate automatically.
- Creates a standalone note otherwise.
Using Notes in a Meeting
Once the tab loads, the Meeting Copilot interface is shown directly in the Teams meeting side panel. You have access to all note features — live notes, transcript, AI chat, bot controls, and configuration — without leaving the meeting.Native extensions for other meeting platforms (Zoom, Google Meet, etc.) are planned for the future. In the meantime, you can use Meeting Copilot with any platform by following the steps below.
Using Notes Without the Teams App
If you’re on a meeting platform other than Teams — or prefer not to use the Teams tab — you can still use Meeting Copilot by creating a note manually:- Navigate to the Meeting Copilot dashboard and click ”+ New Note”.
- Open the note and go to the Bot tab.
- Paste your meeting URL (Zoom, Google Meet, Teams, etc.) and click Launch Bot.
- Admit the bot when it appears in your meeting lobby.
Meeting Copilot Dashboard
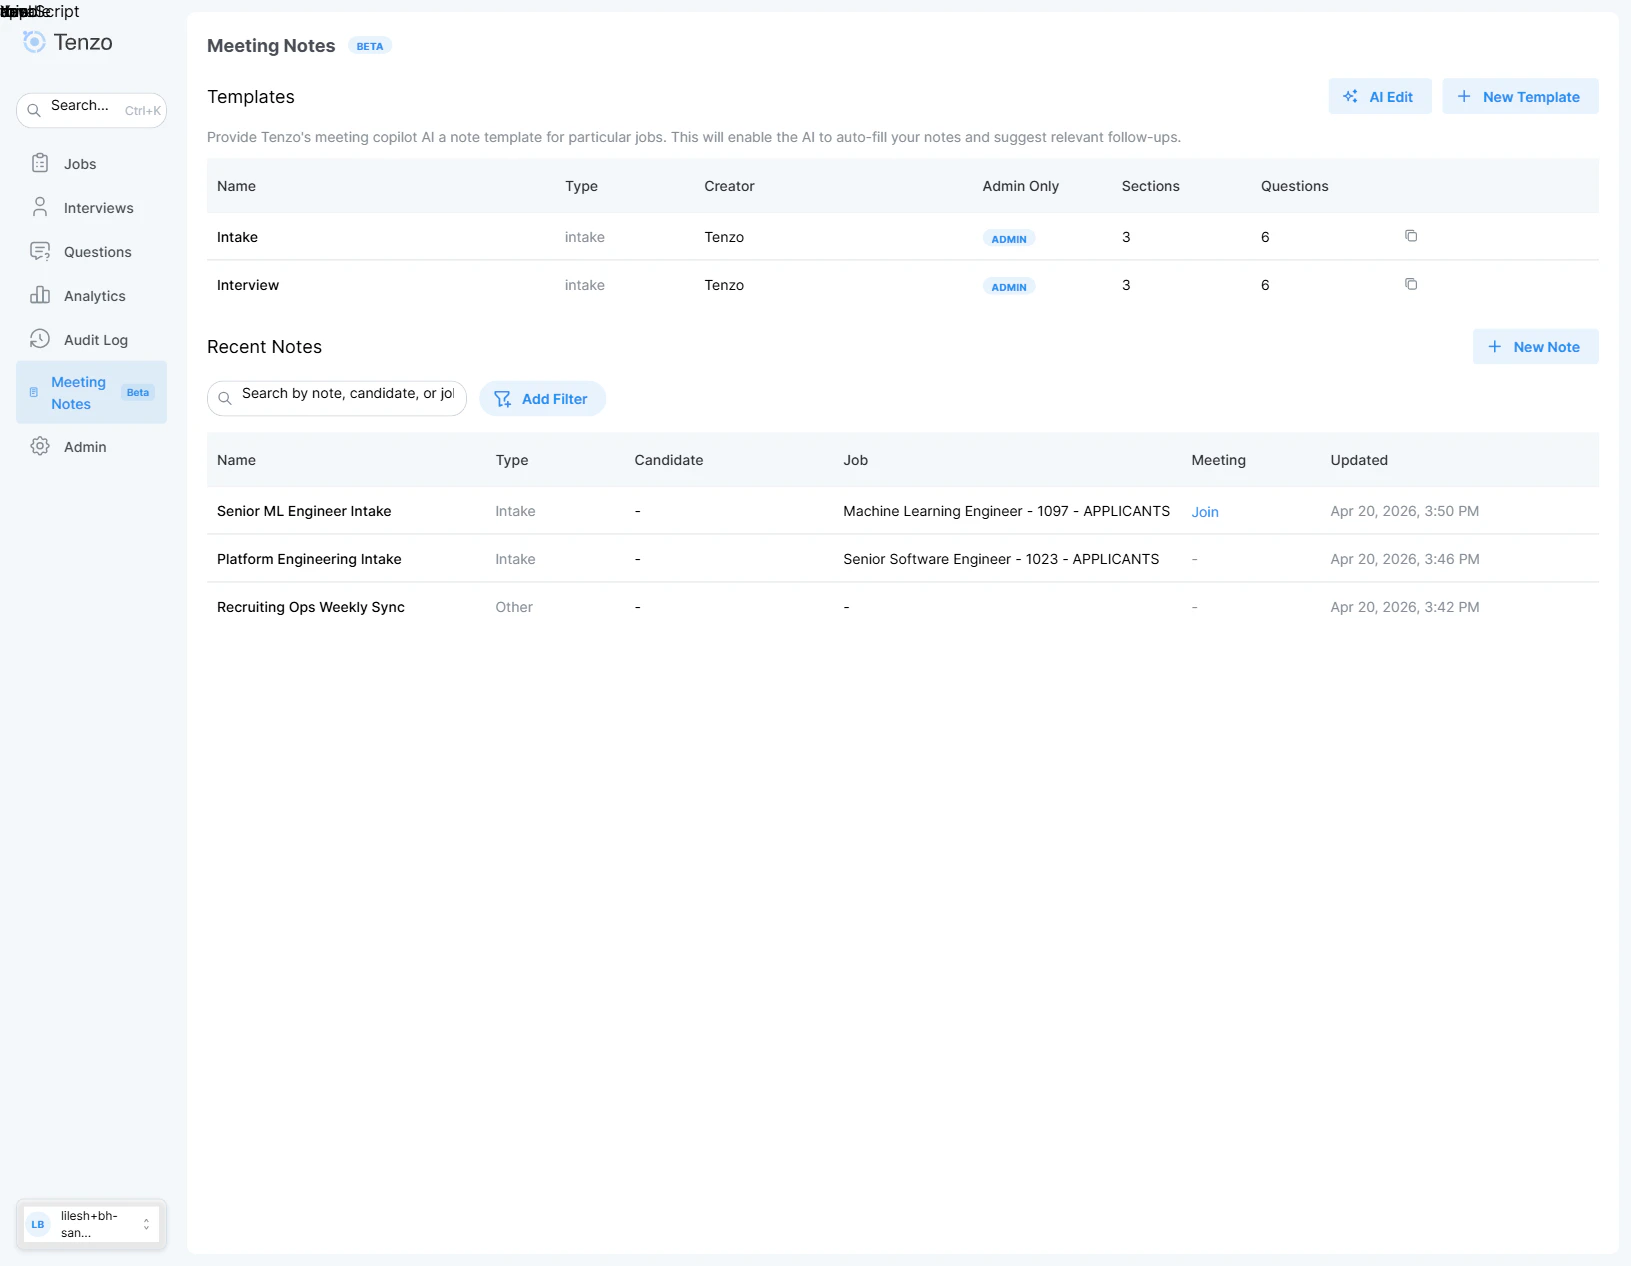
The Meeting Copilot dashboard is your central hub for managing templates and notes. Access it from the sidebar by clicking Meeting Copilot. The dashboard is divided into two sections:Templates
Displays all note templates created for your organization. Each template card shows:- Template name
- Meeting type (Interview, Intake, or Other)
- Total number of questions (summed across all sections)
- Create a new template — Click the ”+ New Template” button.
- Edit a template — Click any template card to open the editor.
- Duplicate a template — Click the copy icon on a template card to create a clone.
- Pin a template — Click the star icon on a template card to pin it. Pinning is per-user: your pins are yours alone and don’t affect your teammates. Pinned templates float to the top of the list and are surfaced first when selecting a template for a meeting.
Recent Notes
A table listing all notes created in your organization, with columns for:- Note name
- Meeting type
- Candidate
- Job
- Meeting link
- Date last updated
Note Templates
Templates define the structure and behavior of your meeting notes. They ensure consistency across meetings and allow the AI to auto-fill responses based on your specific questions.Creating a Template
Click ”+ New Template” from the dashboard to open the template editor modal.Template Settings
| Field | Description |
|---|---|
| Template Name | A descriptive name for the template (e.g., “Engineering Phone Screen”). |
| Meeting Type | Interview, Intake, Staffing Sales Discovery, or Other. Controls which templates appear when configuring a note, and which post-meeting output is generated (meeting summary vs. job description). |
Meeting Types
- Interview — A conversation with a candidate. After the meeting, Tenzo generates a meeting summary and (optionally) syncs it to the candidate or application in your ATS.
- Intake — A kickoff conversation with a hiring manager or client to define a role. After the meeting, Tenzo generates a job description from the template and (optionally) writes a selected set of fields back to the ATS job record. Because intakes are about the job (not a specific applicant), the candidate picker is disabled on intake notes.
- Staffing Sales Discovery — A sales-discovery call with a staffing or recruiting prospect. The copilot is tuned to answer prospect questions and overcome concerns, gather information for a compelling demo, and capture BANT (Budget, Authority, Need, Timeline) to qualify the opportunity. This meeting type is enabled per-organization — contact Tenzo if you don’t see it in the picker.
- Other — Freeform meeting type. No structured summary generation beyond the notes themselves.
Note Format — Sections & Questions
The core of a template is its note format, which defines sections and the questions within each section.- Sections — Logical groupings (e.g., “Technical Skills”, “Culture Fit”, “Compensation”).
- Questions — Specific items the AI will listen for and fill in during the meeting (e.g., “What is the candidate’s experience with Python?”).
- Add, remove, and reorder sections via drag-and-drop.
- Add, remove, and reorder questions within each section.
- Start from an existing summary template as a base, or build from scratch.
Constraints
Constraints are business rules or restricted topics that guide the AI’s behavior during note-taking. Examples:- “Do not include salary information in the summary.”
- “Flag any mention of visa sponsorship requirements.”
Coaching
The Coaching section configures the live annotation badges that the AI surfaces in the Notes and Transcript tabs while a meeting is in progress. Each template carries its own annotation list, so different meeting types (e.g. an intake vs. a phone screen) can call attention to different things. Up to 6 annotations can be configured per template. Each entry has:| Field | Description |
|---|---|
| Title | Display name shown on the live badge (e.g. “Quick Fact”, “Red Flag”). |
| Color | Mantine palette color (gray, red, orange, yellow, green, teal, blue, violet, pink) used for the badge background and icon tint. The same color appears in the Transcript tab to visually link an annotation back to the moment in the conversation that triggered it. |
| Instruction | Free-form prompt fragment the AI uses to decide what to surface and when to remove. Edit this to tune what the annotation looks for, or to add per-org guidance. |
Built-in defaults
Every new template is seeded with five built-in annotations, which you can rename, re-color, edit, or remove:| Annotation | Default color | Surfaces |
|---|---|---|
| Quick Fact | Blue | Background pulled from the candidate’s resume, the job, or prior calls that informs the host’s next response. |
| Follow-Up Question | Green | A specific probe the AI recommends asking next based on what the attendee just said. |
| Compliance Violation | Orange | Moments when a constrained topic (from the Constraints list) is actively being discussed. Skipped entirely if the template has no constraints. |
| Red Flag | Red | Contradictions, impossible claims, or statements that conflict with the context the AI was given. |
| Objection Response | Violet | When an attendee raises a price/timing/need/authority objection, a reframe drawn from the job description. |
Adding a custom annotation
Click Add Annotation to append a new entry, then fill in title, color, and instruction. Custom annotations always have a slot reserved alongside the defaults — the cap is 6 total, regardless of how many built-ins remain. Click Reset to built-in defaults at the bottom of the section to restore the shipped configuration. This overwrites any in-progress edits in the section.Context
An optional free-text field where you can provide additional instructions or background information to the AI (e.g., “This is a senior role requiring 8+ years of experience”).Post-Meeting Actions
The Post-Meeting Actions section (formerly “Summary Format”) groups everything that happens once the meeting ends. It contains collapsible sub-sections:- Summary Format — generated for every meeting type.
- Job Description Format — shown for intake templates only.
- Note Sync — where the generated note is posted in your ATS. It appears last so it follows the content it syncs.
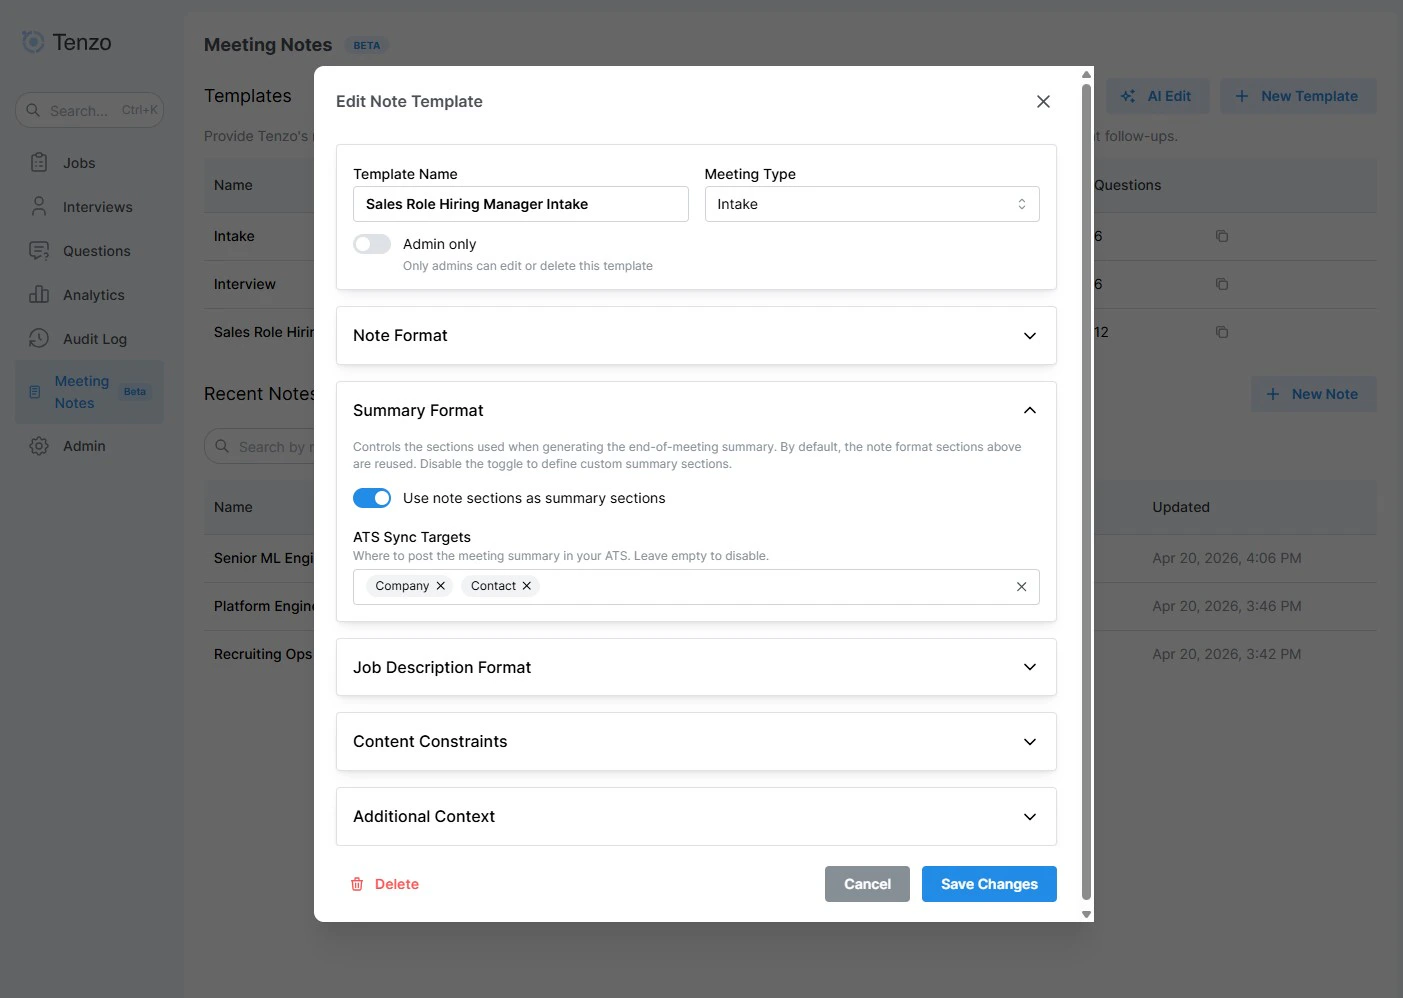
Summary Format
Configures how the post-meeting summary is generated:- Use note sections — Include the template’s sections in the summary output.
- Custom sections — Add additional summary sections beyond the note format.
Note Sync
Choose where the note is posted in your ATS once the meeting ends. Leave empty to disable syncing. Available targets depend on the meeting type — for interviews:Candidate— Post to the candidate’s profile.Application— Post to the specific application.Both— Post to both candidate and application.
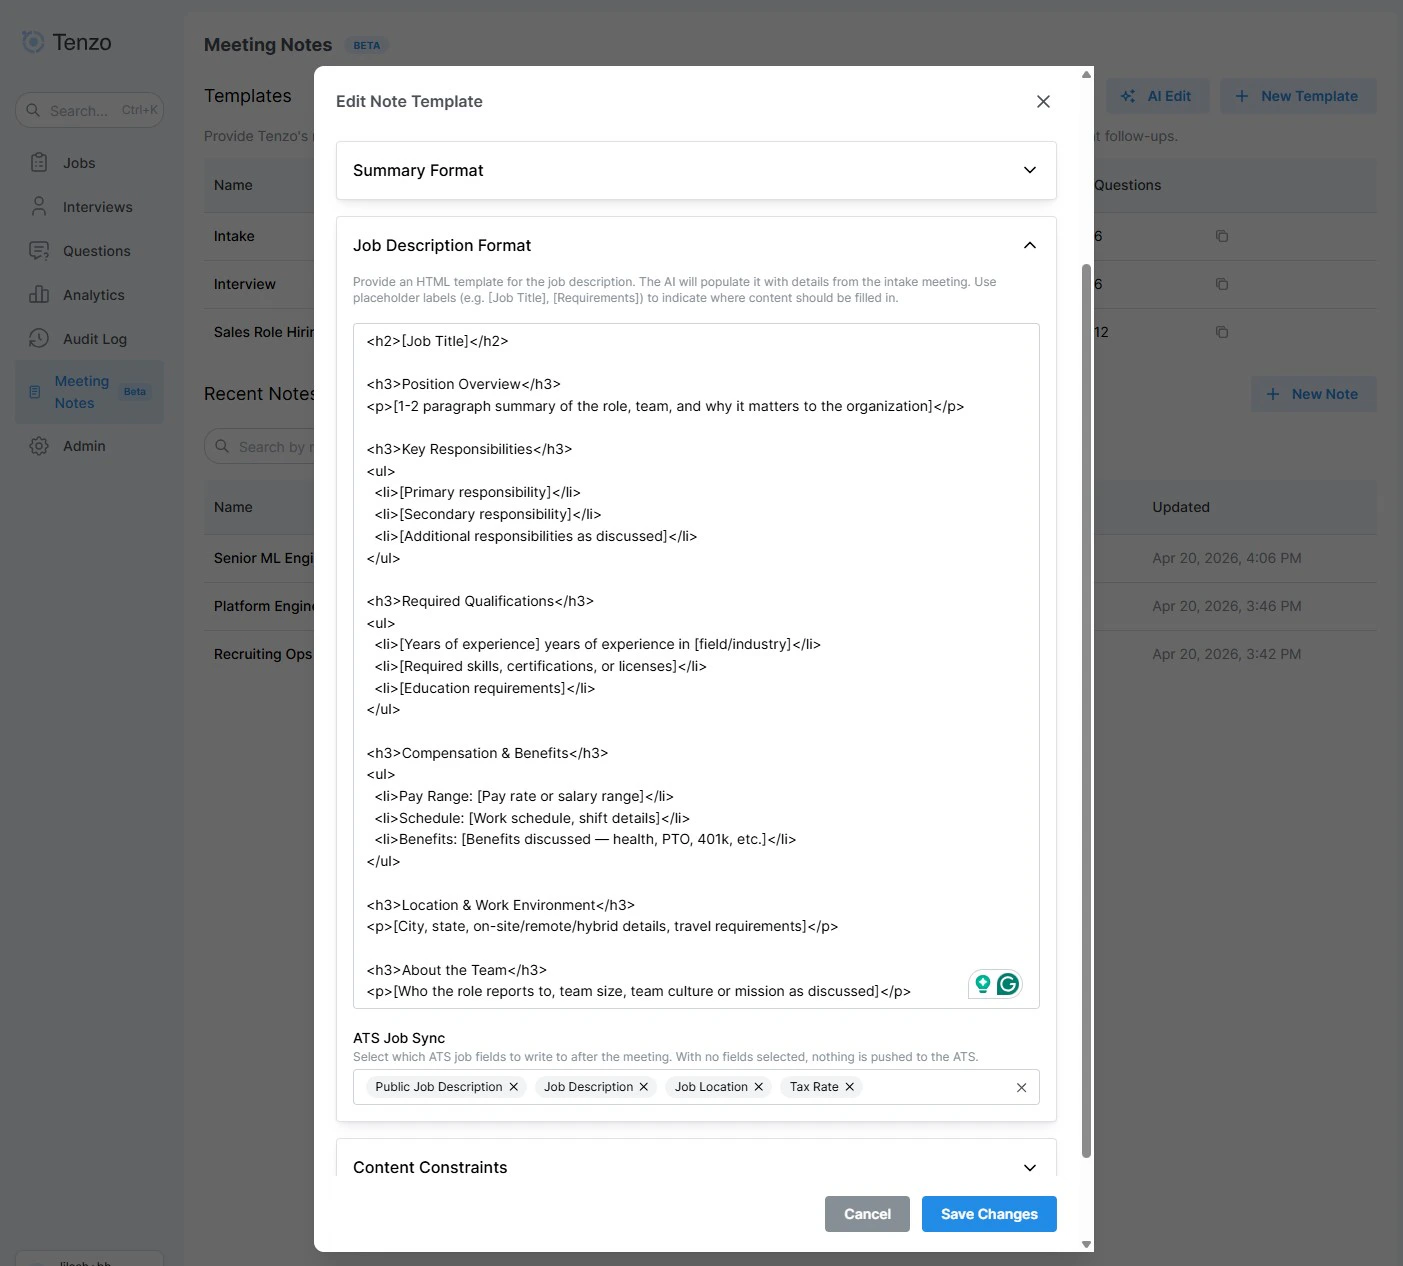
Job Description Format (Intake templates)
For intake templates, configure how the post-meeting job description is generated and which ATS fields it writes.- Job description template(s) — An HTML template for the generated job description. Use placeholder labels (e.g.
[Job Title],[Requirements]) to indicate where content should be filled in. The AI preserves the HTML structure of the template and replaces each placeholder with details pulled from the intake conversation. What you see here depends on your ATS:- ATS exposes description fields — You get one template per description field (e.g. Bullhorn’s internal Description vs. Public Description), each independently editable. A single intake meeting renders a distinct body for each field, so you can produce, say, a detailed internal description and a shorter public posting in one pass.
- No ATS description fields (no ATS, or an ATS that exposes none) — You get a single generic job description template that drives the one generated job description. Clearing this template turns job description generation off entirely.
- The canonical job description — the one emailed and previewed — comes from your primary (first) ATS description field, or from the single generic template when there are no description fields.
- ATS Job Sync — A per-field checkbox list of every writable job field exposed by your ATS integration. Each box picks a field that will be written back to the ATS job record after the meeting:
- Description fields (e.g. Job Description, Public Job Description) are populated from the job description template(s) above — each description field renders from its own template. They’re opted-in by default on new templates.
- Non-description fields (e.g. Salary, Start Date, Location, Employment Type) are extracted directly from the meeting transcript by a second AI pass. Only the fields you tick run through extraction.
- With no fields selected, ATS sync is disabled entirely — the JD is still generated and emailed, but nothing is pushed to your ATS.
- Use the Select all / Clear all buttons to toggle everything at once.
Automatic post-meeting job sync is currently supported for Bullhorn only. For other ATS providers the sync toggle is unavailable and no fields are written automatically — you can still push fields from the note’s ATS Sync tab.
Pinning templates
Pin the templates you actually use so they’re easy to reach. Click the star icon on a template card in the dashboard to pin or unpin it. Pinning is per-user — your pins are yours alone and don’t change what your teammates see. Pinned templates have two effects:- Surfaced first — they float to the top of the dashboard list and appear first (marked with a star) in the Template dropdown when you configure a note.
- Scope the AI’s auto-suggestion — when Tenzo automatically suggests a template for a detected meeting and you have pinned templates, it only ever picks from your pinned set. If you haven’t pinned any, it falls back to choosing from all templates you can see, so auto-suggestion keeps working out of the box.
Job Associations
Link a template to one or more jobs. When a note is configured for a particular job, only templates associated with that job (and matching meeting type) will be shown.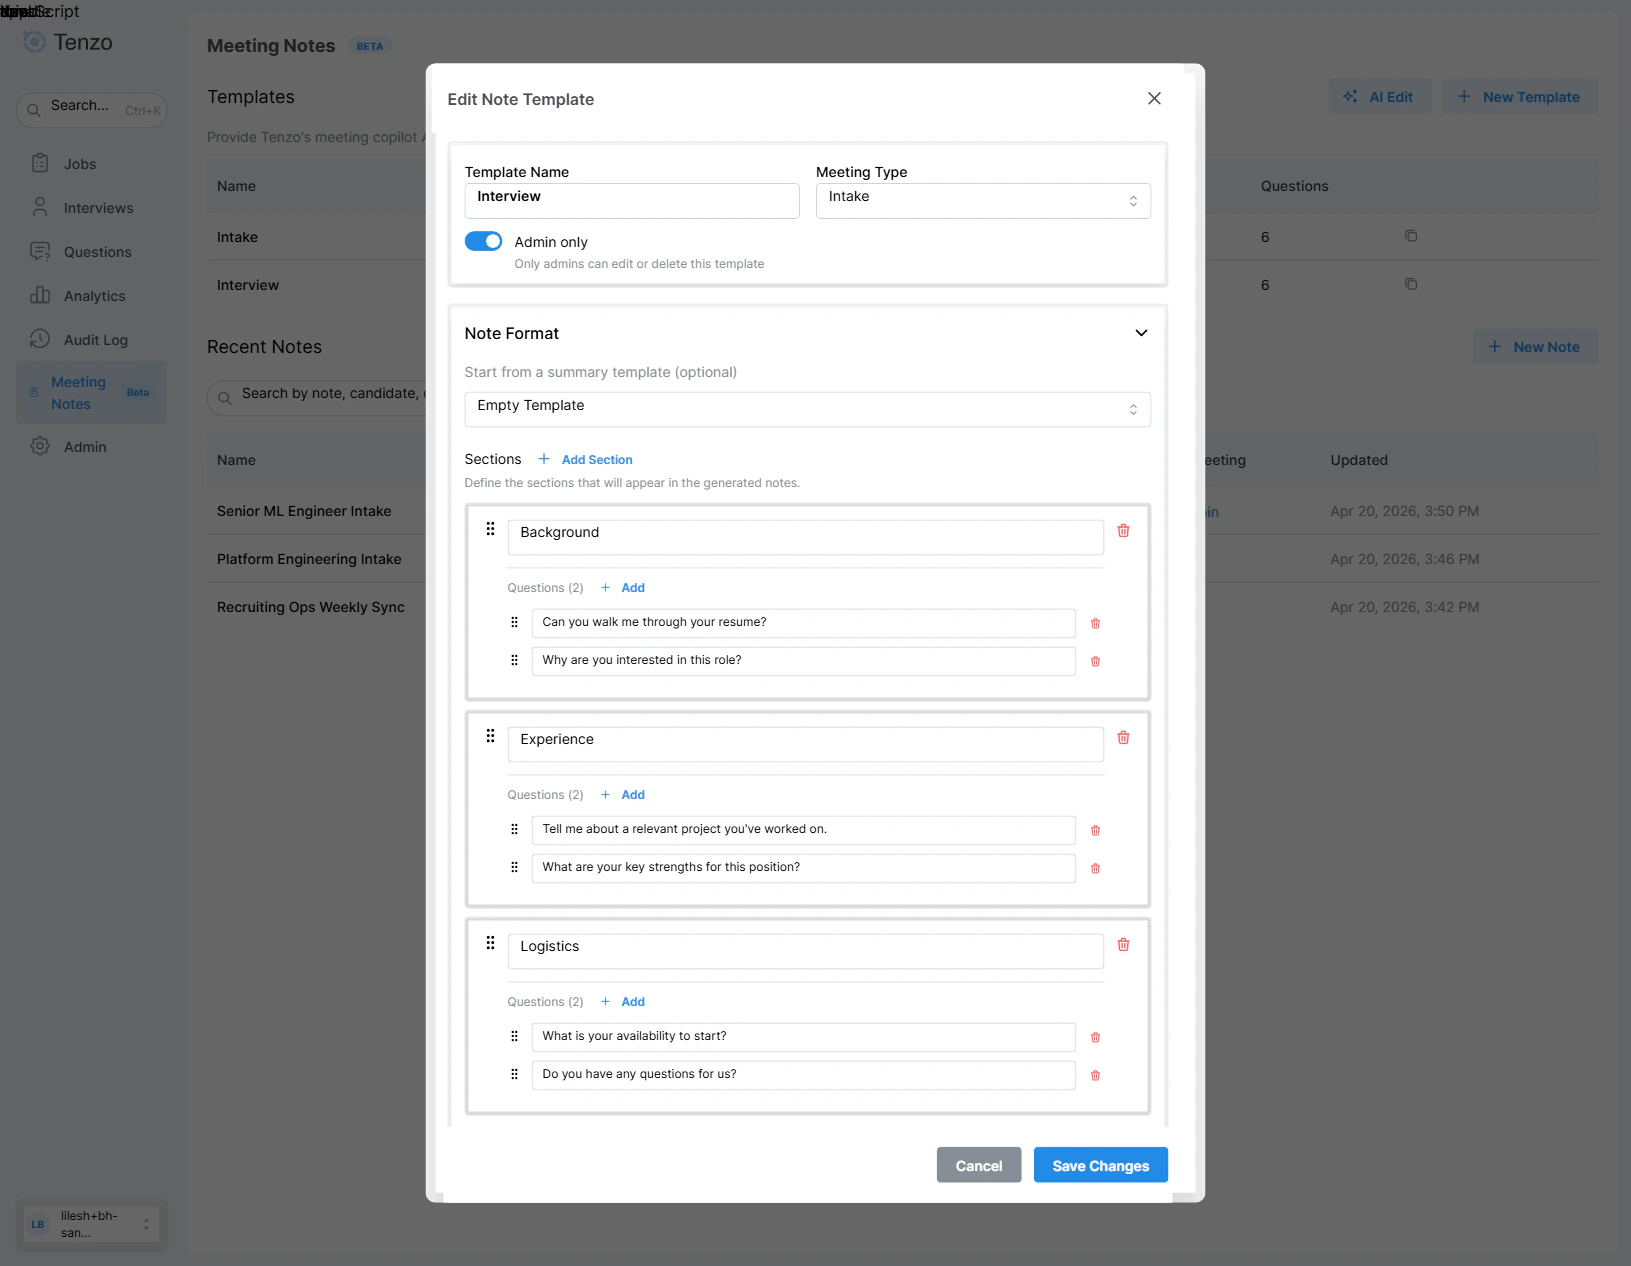
Live Note View
When you open a note, you’ll see a full-featured note-taking interface with multiple tabs.Note Name
The note name appears at the top and is editable — click it to rename.Tabs
| Tab | Description | Availability |
|---|---|---|
| Notes | The primary view. Shows sections and questions with AI-generated responses that update in real time. | Always |
| Transcript | Live transcript of the meeting, showing speaker names and timestamps. | Always |
| AI Chat | A conversational interface to ask the AI questions about the meeting. | Always |
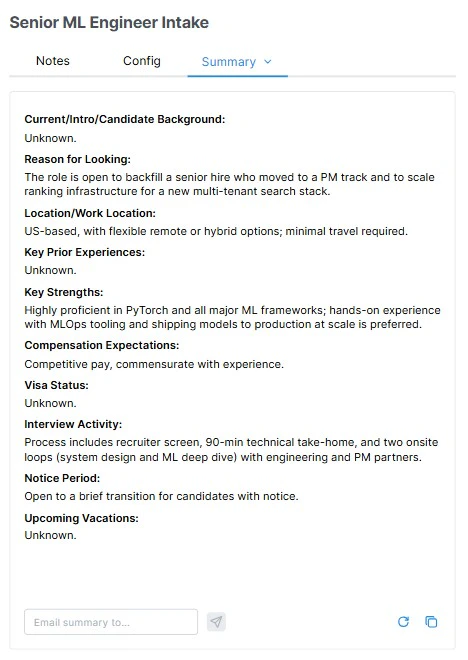
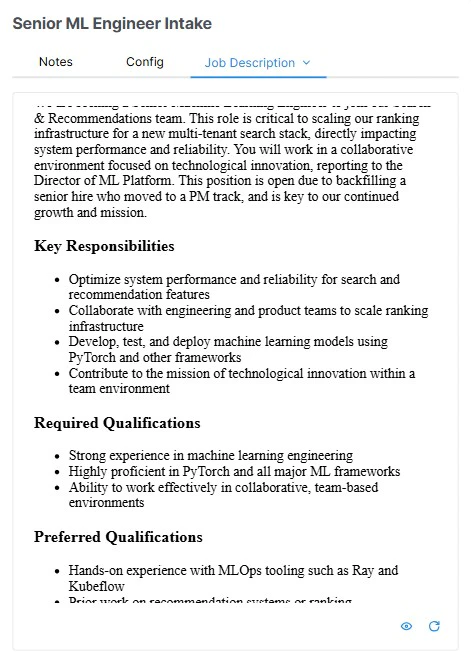
| Summary / Job Description | The post-meeting output (appears after the bot finishes recording). For interview notes this is the meeting summary; for intake notes this is the generated job description(s) rendered from the preset’s templates — one per ATS description field, or a single description when there are none. | After generation |
| ATS Sync | Review the extracted fields against the linked ATS job’s current values and push them to the ATS. The tab is always labeled ATS Sync; a header inside the panel reads Update existing job or Create new job depending on whether the note is linked to an existing ATS job. The tab only appears when the account’s ATS integration supports job creation and sync. | Intake notes |
| Source Jobs | Ranked list of jobs in your org that best match the candidate, based on resume and transcript. | Interview notes |
| Source Candidates | Agentic candidate search driven by the intake conversation’s extracted requirements. | Intake notes with a linked job |
| ID Verification | Face-match check comparing the candidate’s reference photo against video frames captured during the call. | Interview notes (when video frames are available) |
| Bot | Launch or manage the transcription bot. | Always (hidden inside the Teams tab) |
| Config | Configure the note’s template, job, candidate, and meeting type. | Always |
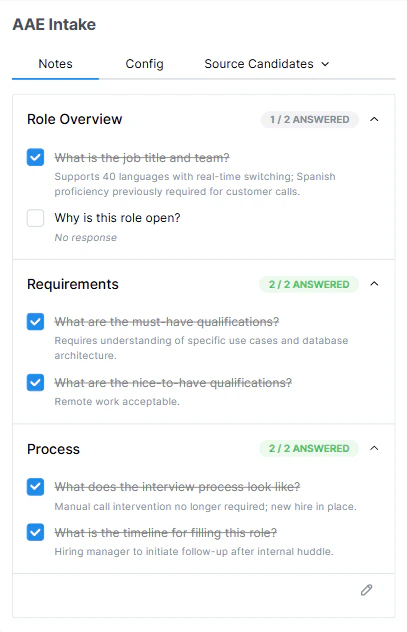
Notes Tab — Real-Time Note-Taking
While the bot is active, the Notes tab updates in real time:- AI-generated responses appear and update as the conversation progresses.
- A brain icon indicates the AI is processing the transcript.
- A pencil icon indicates the AI is actively writing to the notes.
- Each question has an “answered” checkbox to track completion.
- Annotations (info, warnings, follow-up questions) may appear at the top level or on individual questions.
- Toggle edit mode (pencil button at the bottom right) to manually modify any response.
- Add new sections and questions that emerge during the conversation.
- Edit section titles and question text for clarity.
Annotations
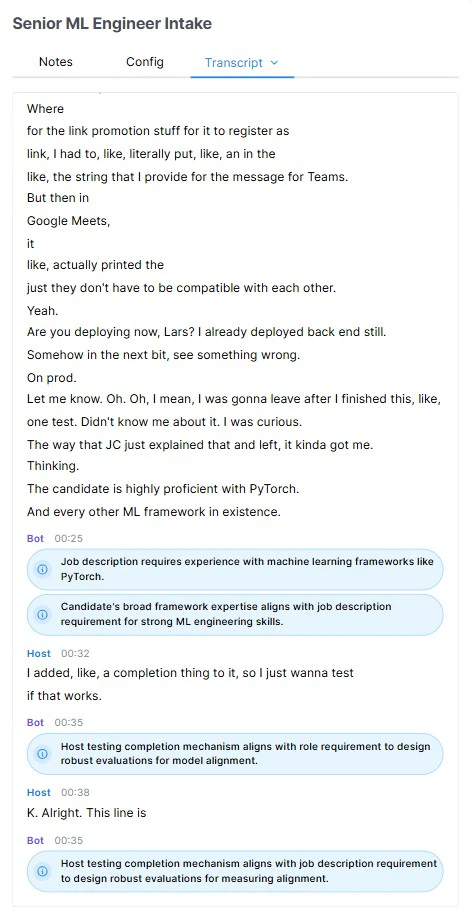
Annotations are short AI-generated callouts that highlight things worth surfacing above the raw note responses. They can attach to the note as a whole or to a specific question. The set of annotation types that can appear, along with their colors and instructions, is configured per template in the Coaching section of the template editor (see Coaching). Out of the box every template ships with five built-in types — Quick Fact, Follow-Up Question, Compliance Violation, Red Flag, and Objection Response — and admins can rename them, recolor them, edit their instructions, or add custom ones up to a cap of six per template. Each annotation includes a short reasoning blurb explaining why the AI raised it. The badge color and icon match the configuration on the template, so the same color is reused on the Transcript tab to link the annotation back to the moment in the conversation that triggered it.Transcript Tab
A scrollable view of the full meeting transcript, including:- Speaker name and role
- Timestamps for each utterance
- Inline annotations from the AI
Note Configuration
The Config tab lets you associate metadata with a note to improve AI accuracy.| Setting | Description |
|---|---|
| Meeting Type | Interview, Intake, or Other. Only templates matching the selected type are shown. Changing the type will clear the current template if it no longer matches. For Intake meetings, the candidate field is disabled. |
| Template | Select a template matching the meeting type. Your pinned templates appear first (marked with a star), followed by templates you created. Selecting a template auto-sets the meeting type to match. If no templates exist for the current type, a Create Template link opens the dashboard. Changing the template will overwrite existing notes. |
| Job | Link the note to a specific job. Searchable dropdown. Changing the job clears the selected candidate. |
| Candidate | Link the note to a specific candidate. Requires a job to be selected first and is disabled for Intake meetings. Searchable dropdown filtered by the selected job. |
- Override ATS Field Sync (intake only) — Opens a modal with the same ATS field checkbox list as the template editor. The modal is pre-populated with the currently-selected template’s default field set. Any changes you make here narrow the sync on a per-note basis without editing the underlying template — useful when a particular intake should only write a subset of fields. Switching the template always resets the override back to the new template’s defaults.
- Email summary when generated — Toggle whether the generated summary or JD is emailed when it’s ready. This is on by default and pre-filled with the email of whoever created the note; edit the recipient or turn it off as needed.
Paste a JD draft
When the note has no linked Job, a Paste JD draft text area appears on the Config tab (and on the intake Send invite / Call now modals). Drop in whatever you have on the role — a few bullets, a rough paragraph, or a full job description copied from elsewhere. The draft is used to generate the auto-suggested questions described below — Tenzo reads it to figure out which gaps the JD doesn’t already cover. Once the note is later linked to a real job, the job’s description takes over and the draft is no longer used.Auto-suggested questions
When you click Save Configuration, Tenzo reads the JD (either the linked job’s description or the pasted draft) and adds up to 3 short clarifying questions to the note’s question list — one for each obvious gap the JD leaves open (e.g. missing seniority, unclear comp band, ambiguous location policy). For interview notes with a linked candidate, this also folds in any follow-up suggestions surfaced by prior calls with that candidate. Suggested questions appear in the same list as your template questions but are marked as suggested (not bold) so you can quickly edit, reorder, or delete any you don’t want. Re-saving the Config regenerates the suggestions against the latest JD and prior-call context.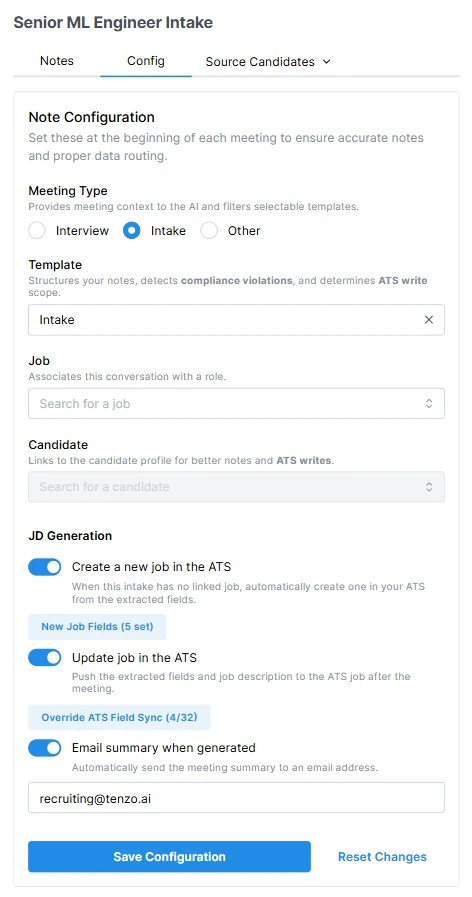
Meeting Transcription Bot
The transcript bot joins your meeting, records the audio, transcribes it in real time, and powers the AI note-taking engine.Launching the Bot
From the Bot tab in the note view:- Enter the meeting URL — Supports Teams, Zoom, Google Meet, and other common platforms.
- Choose when to join:
- Join now — The bot attempts to join immediately.
- Schedule for later — Pick a date and time for the bot to join automatically.
- Click Launch Bot or Schedule Bot.
Admitting the Bot
When the bot joins, it will appear in the meeting lobby. A notification reminds you to admit it after launching.Removing the Bot
If you need to stop recording early, kick the bot from the meeting. Upon leaving, it will trigger summary / JD generation.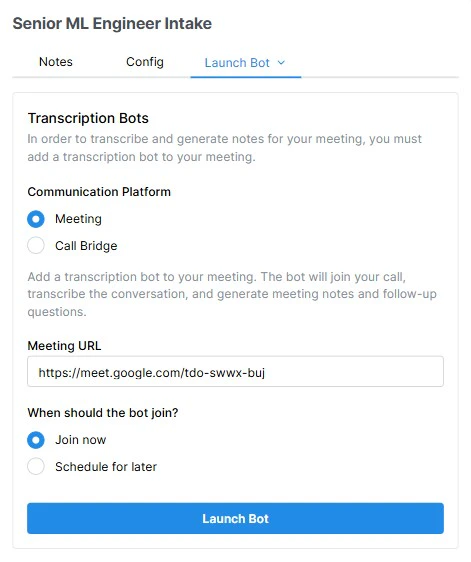
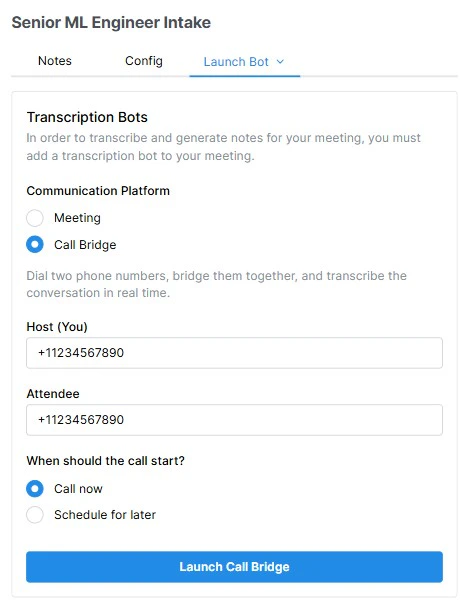
Call Transcription Bot
As an alternative to joining a video meeting, you can also initiate a bridge call — a phone-to-phone conversation connected through Tenzo that is transcribed and turned into notes just like a video meeting. From the Bot tab, switch the mode to Bridge and:- Enter both phone numbers — your number and the other party’s number. If a candidate is linked to the note, their phone number is pre-filled.
- Choose when to connect:
- Call now — Both parties are dialed immediately and connected through the bridge.
- Schedule for later — Pick a date and time and the bridge will dial out automatically.
- Click Launch Bridge or Schedule Bridge.
Scheduled Follow-Up Flow
For interviews scheduled through Tenzo’s calendar integration, the note-taking bot can be automatically scheduled.How It Works
- When an interview is scheduled via the platform (Google Calendar or Outlook integration), a note is automatically created and linked to the meeting.
- The bot is pre-scheduled to join the meeting at the specified start time.
- Before the meeting begins, the system pre-loads context for the AI, including:
- The candidate’s resume and profile information
- The job description
- Prior call Q&A and interaction history
- When the meeting starts, the bot joins automatically — no manual action required (aside from admitting it to the lobby).
- After the meeting ends, the summary is auto-generated and optionally synced to your ATS.
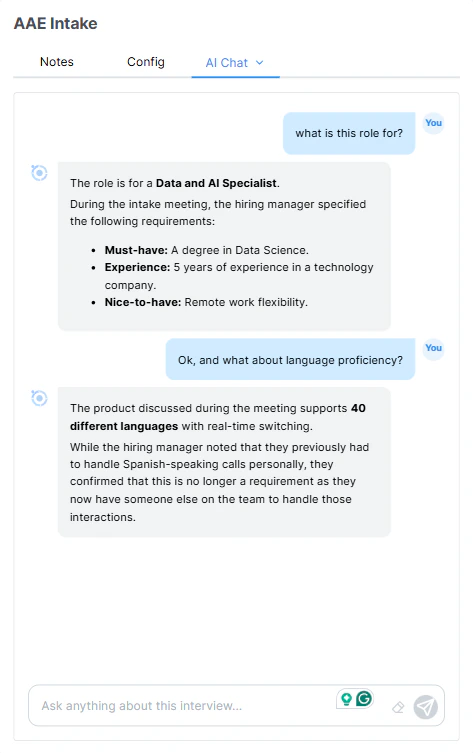
AI Chat
The AI Chat tab provides a conversational interface to interact with the meeting’s AI assistant.Features
- Ask questions about the meeting content (e.g., “What did the candidate say about their management experience?”).
- Request specific summaries or analyses.
- Multi-turn conversation — the AI remembers the full context of your chat.
- Responses stream in real time with markdown formatting support.
- An unread indicator (blue dot) appears on the Chat tab when a new AI response arrives while you’re on another tab.
Source Jobs (Interview Notes)
On interview notes, the Source Jobs tab surfaces the jobs in your org that best fit the candidate based on their resume and anything learned during the interview. Each recommended job is shown as a card with:- Job title and a link into the job detail page.
- Star rating — an overall fit score.
- Reasoning — a short AI-generated explanation of why this job was surfaced.
- Requirement badges — one badge per requirement on the job, grouped into Required, Preferred, and Nice-to-have. Each badge’s color reflects whether the candidate is a Match (green), Partial match (yellow), or No match (gray), and hovering shows the specific evidence the AI used.
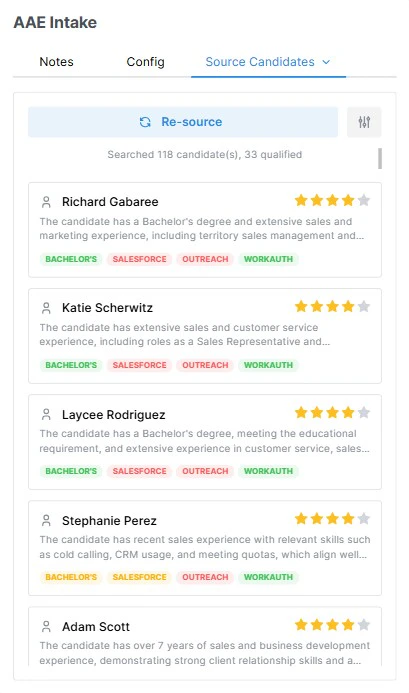
Source Candidates (Intake Notes)
On intake notes that are linked to a job, the Source Candidates tab runs Tenzo’s agentic sourcing engine against the requirements extracted from the intake conversation. The tab streams candidates in real time as they’re found. Each candidate row shows:- Name, current role, and a link to their profile.
- Overall fit rating.
- Per-requirement match badges identical to Source Jobs (Required / Preferred / Nice-to-have, Match / Partial / No match).
- Requirements — add, remove, or edit the list of skills/criteria to search on.
- Years of experience — min/max bounds.
- Location — restrict to specific geographies or allow remote.
- Exclude contacted — skip candidates your team has already reached out to.
- Last note date — only surface candidates whose most recent note is older than a given window.
ID Verification (Interview Notes)
For interviews where the transcription bot captures participant video, Tenzo runs a face-match check to flag identity concerns (e.g., a different person showing up than the one on record). The ID Verification tab shows:- The reference photo on file for the candidate (from Persona or uploaded manually).
- Frames captured from the meeting — one per participant the bot identified.
- A match / no-match badge per participant indicating whether their face matches the reference image.
- Timestamps (MM:SS into the meeting) for each sampled frame so you can scrub back to the original moment in the transcript.
Post-Meeting: Summaries & ATS Sync
Summary Generation (Interview)
Once the meeting bot finishes recording an interview (either when the meeting ends or the bot is manually removed), a summary is automatically generated. The summary:- Is formatted in markdown.
- Incorporates the template’s summary format configuration (note sections + custom sections).
- Appears in the Summary tab of the note view.
- Can be copied to clipboard using the copy button.
Job Description Generation (Intake)
For intake meetings, Tenzo instead runs a job description generation pipeline after the bot finishes:- Each job description template on the preset is rendered with details extracted from the conversation (title, requirements, responsibilities, etc.). When your ATS exposes multiple description fields, every field’s template is rendered into its own job description; otherwise the single generic template produces one job description.
- If any non-description fields are selected in the template’s ATS Job Sync list, a second AI pass extracts structured values for those fields from the transcript (e.g. salary, start date, employment type, location).
- The generated job descriptions appear in the Job Description tab of the note view. The tab shows every generated description — one per ATS description field, each labeled by its field name (or a single description when there are no ATS fields). Each one can be regenerated individually, so you can re-run just the internal or just the public version without touching the others.
Summary / JD Email
After generation, an email is sent to the configured recipient (or meeting organizer) containing the output.- Interview notes receive the HTML meeting summary plus a link back to the full note in Tenzo.
- Intake notes receive the rendered HTML job description plus a field-by-field preview of the ATS writes that will (or did) happen — each row shows the field name, the current ATS value, and the newly extracted value, so you can eyeball the diff before the write lands.
ATS Sync
Interview notes — If configured in the template’s summary format, the summary is automatically posted to your ATS:- Candidate record — The summary appears as a note on the candidate’s profile.
- Application record — The summary appears as a note on the specific application.
- Both — Posted to both locations.
- Description fields are populated with their rendered HTML job description — each description field gets the body generated from its own template.
- Non-description fields are populated with the values extracted by the second AI pass.
- Per-note overrides on the Config tab narrow what’s written for that specific note.
Creating a company or contact from the picker
When you create a new job from a note, the Create new job panel asks you to pick the client company and hiring contact from your ATS. Tenzo searches your ATS by name as you type. If the record doesn’t exist yet — for example a brand-new client discussed in the intake — the picker offers a Create new company / Create new contact option labeled with the name you typed.- Selecting it shows a short confirmation (the entity type, the name, and — for a contact — the parent company) before anything is written.
- On confirmation, Tenzo creates the record directly in your ATS and selects it, so you can finish creating the job without leaving Tenzo.
- A contact is always created under the company you’ve already picked, so choose the company first. Tenzo splits the typed name into a first and last name on the final space.
Viewing Notes After a Meeting
There are several ways to access completed meeting notes:Meeting Notes Dashboard
Navigate to Meeting Notes in the sidebar to see all notes in the Recent Notes table. Click any note to view the full details, including the transcript, notes, summary, and chat history.Candidate Interview Tab
For notes linked to a specific candidate, the meeting summary and notes will also appear on the candidate’s Interview tab within their profile. This provides interviewers and hiring managers quick access to meeting outcomes directly from the candidate view.ATS
If ATS sync is enabled, summaries are available directly in your ATS on the candidate or application record (depending on configuration).FAQ
What meeting platforms are supported?
What meeting platforms are supported?
The transcript bot supports Microsoft Teams, Zoom, Google Meet, and other major video conferencing platforms. Phone conversations are also supported via bridge calls — Tenzo dials out to both parties and records the call for transcription.
Can I edit notes after the meeting?
Can I edit notes after the meeting?
Yes. Open any note and toggle edit mode on the Notes tab to make manual changes.
Is there a limit on the number of notes?
Is there a limit on the number of notes?
Each organization can have up to 1,000 notes.
Can multiple people view a note at the same time?
Can multiple people view a note at the same time?
Yes. Notes update in real time, so multiple users can view the same note simultaneously during or after a meeting.
What happens if I change the template after notes have been generated?
What happens if I change the template after notes have been generated?
Changing the template will overwrite the existing note structure. A confirmation dialog will warn you before applying the change.